Saturday, 13 May 2023

Programming Robots Virtually 4: Preview of Edbot Studio

In previous post I looked at a few on-line robot simulators (see links below)

A recent addition to these is the Edbot Studio Virtual Playground https://studio.ed.bot/;  a preview of simulation technology for Robots in Schools Ltd Edbot robots. 

Two Edbot robots are shown in a gym; you can select actions for the robots to carry out, including Gangam-style dancing and Head Stands.


This is really a preview of the tech, rather than a programming option - at the moment. Robots in Schools Ltd, who make the Edbots, say the Virtual Playground will be part of their Edbot Studio a browser-based Environment to allow both coding in Scratch, Python and JavaScript, of both virtual and real robots.

I am really curious to see the full Edbot Studio in action when it is released, but for the moment getting virtual robots to dance and kick is still really good fun.


The physical robots -EdBot are available from https://ed.bot/


All opinions in this blog are the Author's and should not in any way be seen as reflecting the views of any organisation the Author has any association with. Twitter @scottturneruon

Friday, 31 December 2021

Top 10 viewed posts 2021 on the Robot and Physical Computing Blog


All opinions in this blog are the Author's and should not in any way be seen as reflecting the views of any organisation the Author has any association with. Twitter @scottturneruon

Sunday, 26 December 2021

Hug Avoider 4 - micropython, Eggbot and speech

The last of the posts on the Hug avoider and the 4Tronix's Eggbit


4Tronix's Eggbit (in fact I bought three of them https://shop.4tronix.co.uk/collections/bbc-micro-bit/products/eggbit-three-pack-special  :-) recently) is a cute add-on for the microbit. In three previous posts I looked at eggbit using microcode to  produce a hug avoider - warns when people at too close.


In this post using the buttons and adding (via Microbit V2 with its speaker) simple speech


1. Buttons

Pins for the buttons
  • pin8 - Green button
  • pin12 - Red button
  • pin14 - Yellow button
  • pin`6 - Blue button

    if pin12.read_digital()==1:
        #Red Button
        blank_it()
    if pin8.read_digital()==1:
        #Green button
        startingMessage()
    if pin14.read_digital()==1:
        #Yellow button
        rainbow()
    if pin16.read_digital()==1:
        #Blue botton
        display.show(Image.ASLEEP)

2. Speech


    mess1 = [
    "This is the hug avoide",
    "please keep back",
]
# Take from https://microbit-micropython.readthedocs.io/en/latest/tutorials/speech.html
    for line in mess1:
        speech.say(line, speed=120, pitch=100, throat=100, mouth=200)
        sleep(500


The speech is difficult to hear but is fun and there are possibly ways to improve this starting with the information on  https://microbit-micropython.readthedocs.io/en/latest/tutorials/speech.html


3. Overall

from microbit import *
from machine import time_pulse_us
import neopixel, speech

sonar =pin15
sonar.write_digital(0)
fireled=neopixel.NeoPixel(pin13,9)

def rainbow():
    fireled[0] = (255, 0, 40)
    fireled[1]=  (255,165,0)
    #block=yellow
    fireled[2] = (255,255,0)
    #block=green
    fireled[3] = (0,255,0)
    #block=blue
    fireled [4] = (0,0,255)
    # block=indigo
    fireled[5] = (75,0,130)
    # block=violet
    fireled[6] = (138,43,178)
    #block=purple
    fireled[7] = (255,0,255)
    fireled.show()

def blank_it():
    for j in range(8):
        fireled[j] = (63, 0, 0)
    fireled.show()

def howfar():
    sonar.write_digital(1)
    sonar.write_digital(0)

    timeus=time_pulse_us(sonar,1)
    echo=timeus/1000000
    dist=(echo/2)*34300
    sleep(100)
    return dist

def startingMessage():
    mess1 = [
    "This is the hug avoide",
    "please keep back",
]
# Take from https://microbit-micropython.readthedocs.io/en/latest/tutorials/speech.html
    for line in mess1:
        speech.say(line, speed=120, pitch=100, throat=100, mouth=200)
        sleep(500)

def buttonplay():
    if pin12.read_digital()==1:
        #Red Button
        blank_it()
    if pin8.read_digital()==1:
        #Green button
        startingMessage()
    if pin14.read_digital()==1:
        #Yellow button
        rainbow()
    if pin16.read_digital()==1:
        #Blue botton
        display.show(Image.ASLEEP)
  
while True:
    buttonplay()
    dist=howfar()
    if dist>30:
        pin2.write_digital(1)
        pin0.write_digital(0)
        display.show(Image.HAPPY)
    else:
        pin2.write_digital(1)
        pin0.write_digital(1)
        blank_it()
        speech.say("back away please", speed=120, pitch=100, throat=100, mouth=200)
        display.show(Image.ANGRY)


All opinions in this blog are the Author's and should not in any way be seen as reflecting the views of any organisation the Author has any association with. Twitter @scottturneruon

Thursday, 23 December 2021

Hug Avoider 3 - experiments with Python and 4Tronix Eggbit

via GIPHY


4Tronix's Eggbit (in fact I bought three of them 
https://shop.4tronix.co.uk/collections/bbc-micro-bit/products/eggbit-three-pack-special  :-) recently) is a cute add-on for the microbit (see above). In two previous posts I looked at eggbit using microcode to  produce a hug avoider - warns when people at too close.

This post replicates some of this, but this time using Python and shows the stages of the build
  • Get the ultrasound to find the distance;
  • Produce smile and surprise on the eggbit's 'mouth';
  • Produce rainbow on the neopixels or all the pixels turning red;
  • Bring it all together so if the person is too close, less than 30cm it reacts.

 
1. Ultrasonic detection

Probably the most challenging bit of this was getting the ultrasonic distance measrement working. It actually is not that difficult; especially using code from  https://firialabs.com/blogs/lab-notes/ultrasonic-distance-sensor-with-python-and-the-micro-bit as the basis of the solution and pin15 does both triggering and receiving. Code sends a pulse out, picked up  and processed to get the distance from the delay. The code is shown below:

from microbit import *
from machine import time_pulse_us

sonar =pin15
sonar.write_digital(0)

while True:
    sonar.write_digital(1)
    sonar.write_digital(0)
    
    timeus=time_pulse_us(sonar,1)
    echo=timeus/1000000
    dist=(echo/2)*34300
    sleep(100)
    display.scroll(str(dist))


2. LEDs
To get a greater understanding of how 4Tronix's makecode extension (used in the previou posts) for the Eggbit controls the various pins the best resource was to reverse engineering the code  from https://github.com/4tronix/EggBit/blob/main/eggbit.ts in their github respository for the Eggbit. 

This gave the colours and the correct pin for the LEDs the code is shown below. Producing a rainbow method and a method to set the LEDs/neopixels to red. 

import neopixel


fireled=neopixel.NeoPixel(pin13,9)

def rainbow():
    fireled[0] = (255, 0, 40)
    fireled[1]=  (255,165,0)
    #block=yellow
    fireled[2] = (255,255,0)
    #block=green
    fireled[3] = (0,255,0)
    #block=blue
    fireled [4] = (0,0,255)
    # block=indigo
    fireled[5] = (75,0,130)
    # block=violet
    fireled[6] = (138,43,178)
    #block=purple
    fireled[7] = (255,0,255)
    fireled.show()
    
def blank_it():
    for j in range(8):
        fireled[j] = (63, 0, 0)
    fireled.show()


3. 'Face'
Eggbit has set of LEDs that represent a mouth, controlled via three pins. Only two of those are used in this example

'Smile' is pin2.write_digital(1) the 'lower' part of the mouth and turn off upper part of the mouth pin0.write_digital(0)

'Surprise' uses both parts 
pin2.write_digital(1)
pin0.write_digital(1)


4. Overall

So putting this altogether 

from microbit import *
from machine import time_pulse_us
import neopixel

sonar =pin15
sonar.write_digital(0)
fireled=neopixel.NeoPixel(pin13,9)

def rainbow():
    fireled[0] = (255, 0, 40)
    fireled[1]=  (255,165,0)
    #block=yellow
    fireled[2] = (255,255,0)
    #block=green
    fireled[3] = (0,255,0)
    #block=blue
    fireled [4] = (0,0,255)
    # block=indigo
    fireled[5] = (75,0,130)
    # block=violet
    fireled[6] = (138,43,178)
    #block=purple
    fireled[7] = (255,0,255)
    fireled.show()
    
def blank_it():
    for j in range(8):
        fireled[j] = (63, 0, 0)
    fireled.show()

def howfar():
    sonar.write_digital(1)
    sonar.write_digital(0)
    
    timeus=time_pulse_us(sonar,1)
    echo=timeus/1000000
    dist=(echo/2)*34300
    sleep(100)
    return dist

while True:
    dist=howfar()
    if dist>30:
        pin2.write_digital(1)
        pin0.write_digital(0)
        rainbow()
        display.show(Image.HAPPY)
    else:
        pin2.write_digital(1)
        pin0.write_digital(1)
        blank_it()
        display.show(Image.ANGRY)


All opinions in this blog are the Author's and should not in any way be seen as reflecting the views of any organisation the Author has any association with. Twitter @scottturneruon

Tuesday, 21 December 2021

Hug Avoider 2 - #4tronix #Eggbit


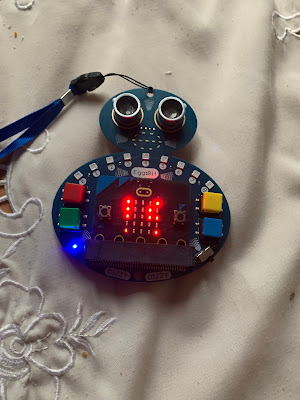
starting hug avoider 2


In an earlier post this year ( 4tronix Eggbit - cute and wearable - hug avoider) I played with 4Tronix's Eggbit (in fact I bought three of them https://shop.4tronix.co.uk/collections/bbc-micro-bit/products/eggbit-three-pack-special  :-) recently). In that one I used a microbit V1.

In this post, I am using a microbit V2 and replicating the idea but with adding a sound; when people get too close as a bit of fun and surprise for relatives at christmas. 

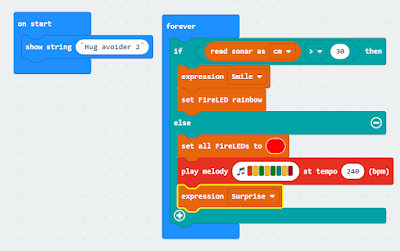
The code written using Makecode for Microbit (https://makecode.microbit.org/) and the extension for it 4Tronix's developed (see https://4tronix.co.uk/blog/?p=2485 for more details)  is shown below:


makecode for microbit for the hug 2 avoider

Essentially the device goes on; puts a message on the LED display "Hug Avoider 2" and then puts a rainbow on the neopixel syle LEDs and a smile on the small 'mouth' - if the ultrasonic sensor doesn't pick up anyone in front.


No one getting ready to hug


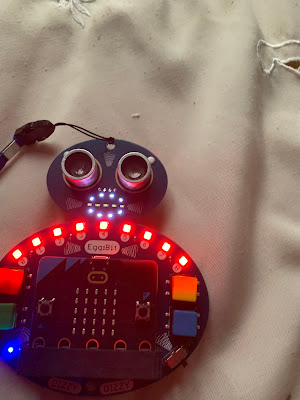
If the ultrasonic sensor picks up anyone in front; LEDS change to red, a sped-up version of one of the standard tunes in Makercode is played and the mouth changes to a surprised look.

detecting someone is too close


Good fun, didn't stop anyone and my son made one with the LEDs lighting up as the person got closer.


What I want to look at is the possibility of programming it with Python - something for the new year.


All opinions in this blog are the Author's and should not in any way be seen as reflecting the views of any organisation the Author has any association with. Twitter @scottturneruon

Saturday, 31 July 2021

This blog's Most read 10 posts July 2021


All opinions in this blog are the Author's and should not in any way be seen as reflecting the views of any organisation the Author has any association with. Twitter @scottturneruon

Wednesday, 28 July 2021

Tumbling Turing 1 - initial play with the Turing Tumble @TuringTumble

A product that has kept popping on to my radar has been the intriguing Turing Tumbles  @TuringTumble I admit to being initially hesitant (is just a gimmicky marble run? - it isn't!) a marble powered computer. The idea is using mechanical ideas to visualise computing concepts is thought-provoking and I have always loved marble runs and 'Heath Robinson'/'Rube Goldberg' style machines; so bit the bullet and brought one and I am impressed; it is great fun (more than just as a marble run). 

Let's start with the packaging and components it is and feels like a high quality product. The components feel sturdy and well designed, the storage for the components also feels sturdy (see figure 1). The project book with the exercises etc is a mixture of puzzles and challenges, alongside a short graphic novel/comic; it all feels well executed and thought through. Online there is now a growing community https://community.turingtumble.com/ where new puzzels are posted, alongside new ideas for puzzles and support. Personally, I think this is a great move, and one of the features with the potential to move this from a game  (I have no problem with games), into a tool (as well as a game) for experimentation and also an educational tool.

figure 1: components


It does have elements of a marble run the power to everything is gravity acting on marbles (see figure 2). 


figure 2: Game board


In the video below the set of red and blue marbles, go through the system producing an output of alternating red and blue marbles - simple but good fun.


Where to next then:
- I am aiming to find the time to try out the binary operation puzzles and logic puzzles. 
- then play with other ideas.


The company behind Turing Tumble have recently run a further very successful Kickstarter project for a follow-on idea Spintronics (see below) using mechanical concepts to help visualise and understand electronic concepts. Yes, I have 'pledged' for it along with several thousand others, it looks so Steampunk.


If you would like to play with a spintronic simulation goto https://www.turingtumble.com/upperstory/spintronics/simulator/index.html


All opinions in this blog are the Author's and should not in any way be seen as reflecting the views of any organisation the Author has any association with. Twitter @scottturneruon

Who wants to produce AI produced cartoon strips

Question: How easy is it produce a comic/cartoon using genetative AI? Let's start with  using ChatGPT4o to produce cartoons. The idea wa...