Monday, 9 December 2019

Sphero RVR


Sphero have a track record of making well sort of fast spherical robots (along with a few Star Wars ones) in a recent kickstarter campaign they have a released a tracked robot  https://www.kickstarter.com/projects/sphero/sphero-rvr-the-go-anywhere-do-anything-programmabl/description - RVR and it is still fast and fun.  


It does seem to be a step up, they are allowing more customisation with a expansion port and on-board power, aimed at connecting other pieces of hardware, for example, Microbit and Raspberry Pis.Even without these it is not short of sensors and lights 


The simplest way to program it is still through the Sphero Edu App and its block programming providing a quick way to get going.


This feels (to me) like a move towards the more 'traditional' robot hobbyists market - and that is fine. It comes almost completely built, so it is soon ready to go out of the box which is nice. I am interested to see what resources will be provided by Sphero through their Sphero Developer Site (https://sdk.sphero.com/), there are already some cool looking sample projects on the site https://sdk.sphero.com/samples/. So in all, I think well worth a look.


All opinions in this blog are the Author's and should not in any way be seen as reflecting the views of any organisation the Author has any association with. Twitter @scottturneruon

Monday, 2 December 2019

Free Web based Augmented Reality (AR)

This post is part of the materials for a session on Augmented Reality presenting at the 2019 SolSTICE eLearning and CLT Conference 5-6th June 2019 Edge Hill University https://www.edgehill.ac.uk/solstice/files/2019/05/2019-Book-of-Abstracts.pdf  and the #MergedFutures Event on 14th June 2019.
1. Introduction


So if we go to

Using the markers above with this url running on your device (with a camera enabled) it should add two new objects over the markers. you will need a copy of these images and printed them out. If you have it I would suggest running it in Firefox.


2. Getting Started
The guide for all this is https://aframe.io/blog/arjs/, with this you have pretty much everything you need.


To start your own go to https://glitch.com/ -> new project ->Hello World project

In the index.html deleted everything in there and replace it with

Should have a white box over the Hiro marker when the web camera/phone/tablet is shown the markers.


The code  not in bold below just sets it up - to play with it we don’t need to worry about what it does - we can just use it. The bit in bold is the bit initially we change or add to – in this case it puts a default white box over the marker.


3. Playing with other objects

Now if we replace


With


We get a blue ball in place of the box


Now for some fun
http://www.pngall.com/bee-png/download/84 is a bee image – download it


Go back to Glitch, and if we go to assets we can add the image. Open up the folder that has the downloaded image and drag it into the asset window.

When it stops downloading and shows the image, click on the image to get the new web address we are going to need that next. so take a copy of it.

If we replace


With the following by just adding in src="https://cdn.glitch.com/04b86bba-0978-4bf4-b3a7-2ece72336f90%2FBee-PNG.png" as below


We get a blue ball with a bee stretched over it. But it doesn’t look that great if we remove the color=”blue” we see the bee stuck at the bottom of the ball still but the colours are back.


Now if we replace


With commands to rotate the sphere


We get a rotating sphere with the image on it.

This can be found at https://simplistic-wakeboard.glitch.me and works with the Hiro marker


If you want to find out how I felt about presenting go to https://dandy-custard.glitch.me/


Now let's try a GIF


Download the GIF and then copy (drag and drop) into the asset folder of your project  get the web address and put into src=”” in place of the one that is there already

An example can be found at https://root-reply.glitch.me/ and works with the Hiro marker.


4. Issues and Thoughts

  • Make sure all the markers have white space surrounding them.


  • If I am honest, the technology is cool and useful for educational use, but I not sure where it all can go.   The question is what can others come up with to use it, I would love to hear about it.


Related Links


All opinions in this blog are the Author's and should not in any way be seen as reflecting the views of any organisation the Author has any association with. Twitter @scottturneruon

Sunday, 10 November 2019

picoh -cute and fun OhBot

The OhBot company has recently released a slightly different version to their OhBot - Picoh (https://www.ohbot.co.uk/picoh.html); a cute small robot head. This is a just a short post about some initial playing with the Picoh OhBot.


Windows
I started playing the windows based blocks (see below) programming used for programming the ohbot. Very scratch-like language but packed with lots of features. The program that loads automatically takes you through loads of the features .


Python
I wanted to know if I can use it with a Mac as well. The blocks are not available for a Mac but a Python-based approach is (https://www.ohbot.co.uk/picoh-for-python.html) . Set-up instructions are good, starting from the GitHub site https://github.com/ohbot/picoh-python, the README file is useful including links to setting up for a Mac and links to example programs. Thonny is my prefered IDE for running Python in this case - just for the ease of use really. Mainly I have played with the example programs so far.


Thoughts 
A cool little robot, nice that it can be used on Windows, Mac, Linux/Pi. In the Picho-Python github site, there are some interesting examples, including one that links, Picoh, Wolfram Alpha and Wikipedia - curious about that one.


All opinions in this blog are the Author's and should not in any way be seen as reflecting the views of any organisation the Author has any association with. Twitter @scottturneruon

Friday, 1 November 2019

Top 10 read post on Robots and Physical Computing blog during October 2019


Popular Posts


All opinions in this blog are the Author's and should not in any way be seen as reflecting the views of any organisation the Author has any association with. Twitter @scottturneruon

Monday, 30 September 2019

Most read posts on Robots and Physical Computing blog in September 2019

Popular Posts


All opinions in this blog are the Author's and should not in any way be seen as reflecting the views of any organisation the Author has any association with. Twitter @scottturneruon

Sunday, 22 September 2019

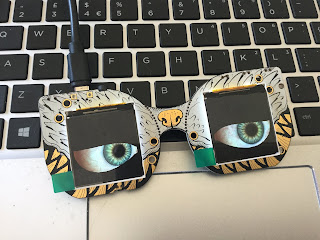
Moving Eyes with an Adafruit Adabox kit


One of the things I enjoy is a subscription to Adabox from Adafruit, receiving the box and very soon before that finding out what the main item is the box is a treat. The latest, at the time of writing, is AdaBox 13 with the MONSTER M4SK a set of small screens, based around 240x240 IPS TFT displays, acting as moving eyes in a mask, along with a couple of masks, speaker, microphone, lenses, etc and craft materials for decorating a mask - a full list can be found here.


My goal was, to play with this, was to create a slightly creepy mask where the eyes move - a simple build but fun to do. The Adafruit quick start guide for this (available here) provides all the instructions on setting it and downloading the different sets of eyes (that is really creepy to write). A set of different graphics files are already available for different sets of eyes;  a couple of examples are shown below. 


One suggestion is when you download the files for the eyes - still creepy - keep a copy elsewhere, in one case I accidentally delete the configuration file I want so it was handy to have a backup.  


Two masks are included in the box, being lazy, I choose the already decorated silvery mask to use. Along with the M4SK device, a set of lenses and holders are included. I struggled a bit with fixing the lenses into the holder and attach to the device - in the end, I choose to leave them out and stick the M4SK to the mask without them. A video of the mask in action is shown below.


There is much to explore with the Monster M4SK including a number of sensors already on the board including a capacitive touch sensor, buttons, a light sensor, a port for connecting a PDM microphone (included in the AdaBox 13). and three other ports. Sound effects can be played from a headphone socket or via a built-in amp driving an 8-ohm 1W speaker (also included in the Adabox). A Lipoly battery can be connected. A guide to getting going via the Arduino IDE is available here.


Related links


All opinions in this blog are the Author's and should not in any way be seen as reflecting the views of any organisation the Author has any association with. Twitter @scottturneruon

Monday, 16 September 2019

starting with NVIDA jetson nano


This is the third of a planned occasional series of posts on playing with some of the current AI specific boards for Intenet of Things (IoT). In the series, it is planned that will be some experiments with the Google Coral accelerator adapter and the Development Board; as well the NVIDIA Jetson Nano. In previous posts I started playing the Coral Accelerator adapter kit and the Coral Development Board.

This post looks a starting with the NVIDIA Jetson Nano Development Kit  which like the Coral Development Board is a small computer designed for running combined embedded and neural network applications. The processing power comes from a quad-core 64-bit ARM CPU and a 128-core integrated NVIDIA GPU (for more details see here)

So before we all get spooked; getting going is relatively easy, basically, follow https://developer.nvidia.com/embedded/learn/get-started-jetson-nano-devkit#intro. Following these instructions I would suggest if you are able to set-up a Raspberry Pi from a download Raspbian image this is not that different


What I wanted to do was attach a camera and grab an image. The board has a MIPI CSI-2 interface which means it should work with a Pi Camera Module V2, here I am using a Leopard Imaging 145FOV wide angle camera & ribbon cable because I had one nearby. A great site, and the one I am using here, for how to use Jetson Nanao and a camera is Jetson Nano + Raspberry Pi Camera which takes you through setting it and testing including the code below to test it. 


$ gst-launch-1.0 nvarguscamerasrc ! 'video/x-raw(memory:NVMM),width=3820, height=2464, framerate=21/1, format=NV12' ! nvvidconv flip-method=0 ! 'video/x-raw,width=960, height=616' ! nvvidconv ! nvegltransform ! nveglglessink -e

The image below was grabbed using the Jetson and camera


I found it easier to get going with this board then the Coral development board (though I do like that as well) and I am looking forward to playing with this board more.


Related Links


All opinions in this blog are the Author's and should not in any way be seen as reflecting the views of any organisation the Author has any association with. Twitter @scottturneruon

Who wants to produce AI produced cartoon strips

Question: How easy is it produce a comic/cartoon using genetative AI? Let's start with  using ChatGPT4o to produce cartoons. The idea wa...