I wanted to contol the CBiS micro:Bit Car via gestures whilst holding another micro:Bit (see Figure 1) I went for: - Button A in combination with moving the micro:bit left or right, moves 'Car' forwards or backwards; - Button B in combination with moving the micro:bit rotated forward or backwards, turns the 'Car' left or right; Perhaps not the most logical combination but fun.
Figure 1: CBiS micro:bit car and 'controller' micro:bit
The inspiration from this remote car idea came from four sources - CBiS Education site and seeing them demonstrating it; - Technology with Save Us Micro:bot Radio Control website ; - DrBadgr blog on the Lunch Box robot; - A twitter conversation
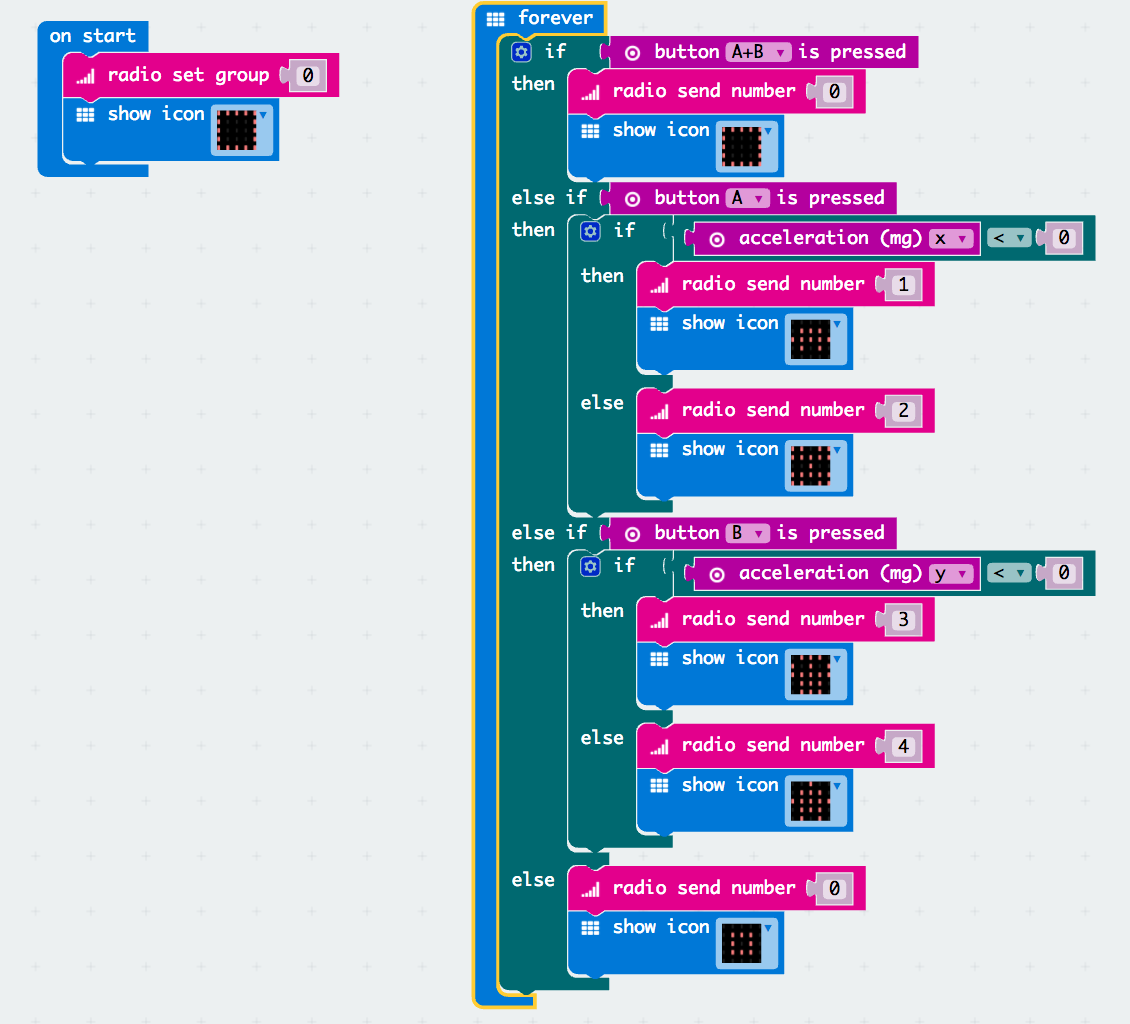
The approach taken is simple; the Controller micro:bit has the following operations (see Figure 2 for the PXT code)
Buttons A+B together send '0' out by a radio protocol;
Button A with changes in the x-direction send '1' or '2';
Button B with changes in the y-direction send '3' or '4' ;
Figure 2: Remote Control
For the code go to: Remote Control - the images produce on the micro:bit, are there as a bit of fun (they have no meaning) and are different for each action. The control on the 'Car' turns the received numbers (sent from the controller) into forward, backward, turning motions and stop. The PXT code can be found at Motor Control.
Figure 3: Car Control
The control is basic but fun (well I enjoyed it). There is a lot of scope for improvement and adaption. Please feel free to adapt any of the code and it would be great to hear what others do via the comments.
All opinions in this blog are the Author's and should not in any way be seen as reflecting the views of any organisation the Author has any association with. Twitter @scottturneruon
At PiWars 2017 (1st-2nd April 2017), thanks to the generosity of CBiS Education, I now have one of their BBC micro:bit RobotCar™ . It is a sturdy bit of kit, encased in an aluminum chassis with a clear acrylic screen - it feels substantial when you pick it up. It is based around fours motors, control by a Micro:Bit, via L298N based motor controller/shield. Batteries power, 8 AAs, the motors and a Lithium powerbank to power the Micro:Bit - all included. More information about the technical details and example software can be found on their site https://www.cbis.education/robotic-car-kit# including further details on the L298N based motor controller/shield, which I found useful for programming it.
I have experimented briefly with programming it in Python (micropython), getting it to it move forward, backward; to the right and left, using the Mu editor. The code is shown below for those who want to try it:
This thing is quick. I like the feel of it, you pick it up and it doesn't feel like it is going to fall apart; because it comes all assembled - including batteries, it is ready to go. I look forward to trying some more ideas on it.
All opinions in this blog are the Author's and should not in any way be seen as reflecting the views of any organisation the Author has any association with. Twitter @scottturneruon
I will start with a confession, I only had about 2 1/2 hours at BETT 2017 due to external time pressures so to say I didn't yet a chance for a good (or even a bad) look around is an understatement; so I am not reviewing the show just a few notes on what I did manage to see. STEAM Village First and mostly, it was great to talk to so many people, only few I had met face to face previously, about robots, micro:bits, Raspberry Pis and coding. Most of this happen in the relatively small (compared to the event space) STEAM village and nearby stalls. It was great to see the strong presence of both Raspberry Pi and Micro:Bit Foundation, along the variety of different activities and example usage of both, with Code Club (I know it is part of Raspberry Pi Foundation) there was well. This was all alongside some other companies Four of these stuck in my mind. 1. DFRobot (https://www.dfrobot.com/) with their range of Arduino-based robots and non-programmable kits. The two kits that caught my eye was the FlameWheel robotics kit (to see more on this go to https://www.dfrobot.com/index.php?route=DFblog/blog&id=563) and the Insectbot kit (see the video below). As an aside, I recently got one of their new designs Antbo through a crowdfunding offer https://www.indiegogo.com/projects/antbo-an-insect-robot-anyone-can-build-steam-diy/ (more this in a future post) 2. School of Code (http://schoolofcode.co.uk/) with their web-based coding but with the emphasis on collaborative coding was great to see. Have at go for yourself at their character building example http://www.schoolofcode.io/game-avatar, done as part of the Hour of Code, it is good fun. 3. It was great see GitHub were there was as well, and they couldn't be more generous with the stickers and other materials. I wish I had more time to talk to them. 4. Last but not least was CBiS Education (http://www.cbis.education/) with an extremely tall model of their DIMM robot. I think their products are interesting, here are a few earlier posts about projects with their products Robot Arm and Python, UFO talks to Robot part 1, UFO talks to Robot part 2). Outside of the STEAM village There were two stands that particularly caught my attention. Robots In Schools Ltd (I wish I own that name) with their Edbot package - a single Edbot but networked so the teacher can share access to the robot by assigning control to the students machine. I really liked this idea. For more details go to: https://robotsinschools.com/inclassrooms/. Second was Ubtech (http://ubtrobot.com/) with their Alpha 1 and 2 (more on Alpha 2 in a future post). What I found most interesting was their ideas of potentially embedding Raspberry Pi or Arduino inside their Alpha 1 for a more open source solution. Would I go back next year? Yes please, but I just want a day or more there though next time.
All opinions in this blog are the Author's and should not in any way be seen as reflecting the views of any organisation the Author has any association with. Twitter @scottturneruon
In part one of this series of posts, the project to get Consumable Robotics UFO and Dimm robot was started but focussed on the UFO kit. The goal being for some action on Dimm to trigger a series of messages being passed between the two of them. In this post, the focus moves to Dimm and the setting up the actions leading to the messaging. Stage 1 Build Using the Micro:bits port 0 (as part of the Dimm robot) for the input from the light sensor, which is included in the kit (Red lead going to 3v and the black lead going to GND). Just to note the less light there is the higher the value on the sensor.
Stage 2 Code Micropython programmed through the Mu editor (see below)
If light levels are high then : scroll a message saying "calling UFO" send the code "dimm" via bluetooth. otherwise: scroll a message saying "I can't see" If it recieves "ufo" via bluetooth : display "Hello, UFO called me" Micropython code import radio from microbit import pin0, pin1, display, sleep radio.on() while True: incoming = radio.receive() if incoming == 'ufo': display.scroll("Hello, UFO called me", 75) if pin0.read_analog()<175: display.scroll("calling UFO") radio.send("dimm") else: display.scroll("I can't see") Stage 3 Testing Video below shows it in action including what happens when the light (in this case a torch) shines on the sensor connected to Dimm; a message is sent and picked up by the UFO kit (LEDs flash and the message saying "DIMM calling" scrolls across the UFO LED array - see UFO talks to robot - part one for more details). A message is sent back from the UFO kit and on Dimm's LED array the message "Hello, UFO called me"). If the light levels are too low then the message "I can't see" scrolls across Dimm's LED array.
As an aside, the Dimm robot still reminds me, a little, of a colourful, friendly, Ood from Dr Who with all the leads hanging out of the 'mouth' - think that is geeky I know.
All opinions in this blog are the Author's and should not in any way be seen as reflecting the views of any organisation the Author has any association with. Twitter @scottturneruon
In previous posts (UFO has Landed and DIMM the OOD), I started playing with the CBiSEducation's UFO consumable robots. Still using the Micro:Bit, in this two part post series, I am going to be playing with using Micropython to send messages between the two kits.
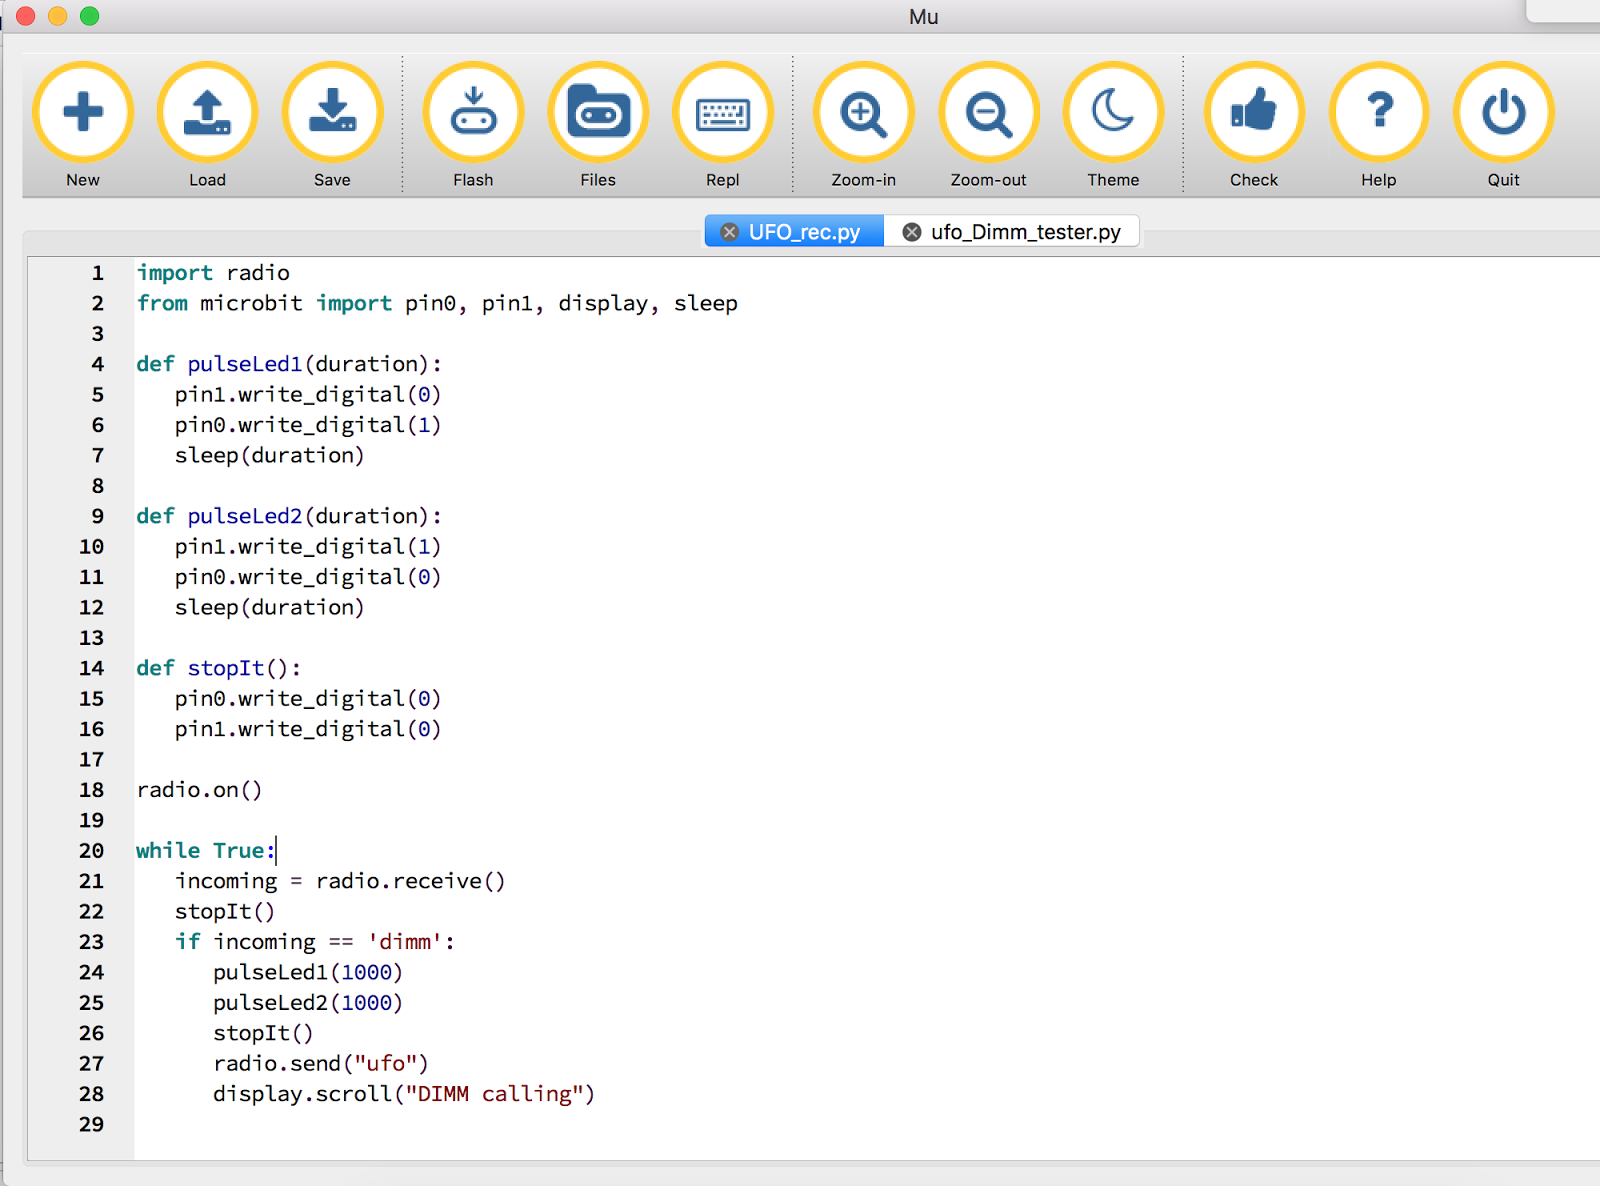
Stage 1 Wiring and Set up-UFO Pins 0 and 1 are outputs to the LEDs The black leads on the UFO go to GND. Micropython, using the Micro:Bit's built in radio module (Bluetooth), is used to communication between the two kits. Stage 2 Code -UFO The code is set to flash the UFO's LEDs and then scroll a message "DIMM Calling" when it receives a message "dimm" via Bluetooth. Basic overview is - Turn on the radio module - radio.on() - If the message is received then turn the LEDs on and off and scrolls "DIMM calling" across the LED array. - send a message via bluetooth "ufo" to whoever is listening (in the end the robot DIMM hopefully). The code is shown below. import radio from microbit import pin0, pin1, display, sleep def pulseLed1(duration): pin1.write_digital(0) pin0.write_digital(1) sleep(duration) def pulseLed2(duration): pin1.write_digital(1) pin0.write_digital(0) sleep(duration) def stopIt(): pin0.write_digital(0) pin1.write_digital(0) radio.on() while True: incoming = radio.receive() stopIt() if incoming == 'dimm': pulseLed1(1000) pulseLed2(1000) stopIt() radio.send("ufo") display.scroll("DIMM calling") To use the radio module you will need to switch to the mu editor (http://codewith.mu/).
Stage 3 Testing it To test it, a second Micro:bit was used to send test signals (the code for this is shown below). When button A is pressed on the second Micro:Bit a message 'dimm' is sent followed by sending 'not'. import radio from microbit import button_a, button_b, sleep radio.on() while True: if button_a.is_pressed(): radio.send('dimm') radio.send('not') if button_b.is_pressed(): radio.send('ufo') radio.send('not')
The UFO does cycle through the sequence LEDs flash and the message scrolls. The slight bug is in repeats it several times before it stops; possibly a buffering issue somewhere. Stage 4 In the next post (http://bit.ly/2d3zlh0), I will be building the Robot DIMM part of the system - sending and receiving message and detecting light levels in micropython.
All opinions in this blog are the Author's and should not in any way be seen as reflecting the views of any organisation the Author has any association with. Twitter @scottturneruon
CBiS Education generously sent me two of their new range of robotics development kits - BinaryBots (https://www.binarybots.co.uk/makers.aspx), these are a range of cardboard based kits (so far a robot and a UFO) with electronic components for example LEDs; sensors and buzzers, depending on the kits. What makes the kits interesting though is they are designed to be controlled by either by a BBC Micro:bit or a CodeBug.In an earlier post, I played with the UFO one (http://robotsandphysicalcomputing.blogspot.co.uk/2016/08/ufo-detects-light.html), now I have had a chance to play the DIMM the robot. With the wires hanging out of the mouth and its humanoid shape it reminds we a bit of the OOD from Doctor Who (https://en.wikipedia.org/wiki/Ood) but a lot more unthreatening.
How to build it video from @cbiseducation is shown below.
So I built a Light detection system with the light sensor that came with the kit and added a microbit. The idea was - to play one sound when the light level is low as well display an 'L' on the Microbit; - to play another sound when the light level is higher and display an 'H' on the Microbit. The code used is shown below. It is built around the forever loop, the light sensor is connected to Pin 1 and the speaker on Pin 0 (ground and Vcc connected as appropriate see the robot below). when the sensor value is greater than 175 then the low light level is detected otherwise the higher light is detected.
The video below shows this enjoyable kit in action - the sound level is a bit low in the video.
All opinions in this blog are the Author's and should not in any way be seen as reflecting the views of any organisation the Author has any association with.
In a previous post (UFO has Landed) I started playing with the CBiSEducation's UFO Consumable Robotics. Now I am going to play with it a bit more and add the light sensor, included in the kit, to it;is so it can detect different light levels. Again it is controlled using the Micro:Bit. Stage 1 - Decorating it The kit comes with some stickers so I added a few.
Stage 2 Wiring Pins 0 and 1 are outputs to the LEDs Pin 2 is the input from the light sensor The red lead from the light sensor connects to 3v and the grounds to the ground. Stage 3 Code
The light sensor works more as a low light level detector, the darker the higher the value returned (in this case) on pin 2. So in low light level, the LEDs flash relatively quickly, when the light level rises half of the LEDs start to pulse more slowly.
All opinions in this blog are the Author's and should not in any way be seen as reflecting the views of any organisation the Author has any association with.
CBiS Education generously sent me two of their new range of robotics development kits - BinaryBots (https://www.binarybots.co.uk/makers.aspx), these are a range of cardboard based kits (so far a robot and a UFO) with electronic components for example LEDs; sensors and buzzers, depending on the kits. What makes the kits interesting though is they are designed to be controlled by either by a BBC Micro:bit or a CodeBug. This blog documents, briefly, an initial play with the UFO kit (see below) using a Micro:Bit for control.
The UFO model came together readily, the instructions were fairly easy to follow. Personally, a feature I especially liked about the model was the LEDs being both on the top and bottom of it - increasing its usefulness. CBiS EducationThey have also provided a webpage / portal with some example projects and code.
My first project I built, was to pulse the LEDs on and off (one set of LEDs on Pin 0, the other on Pin 1). Pin 2 was connected to the buzzer, so produce a low buzz every few seconds. The code below is written using the Block Editor (https://www.microbit.co.uk/create-code)
All opinions in this blog are the Author's and should not in any way be seen as reflecting the views of any organisation the Author has any association with.
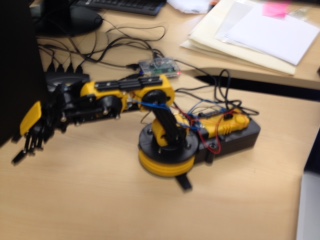
I was asked recently if the USB robot arm could be programmed - I knew the answer was yes. The Arm came from the CBiS Education Robot Arm kit (http://www.cbis.education/Product-Details.aspx?prodid=2 ) which comes with a Raspberry Pi and SD Card with software to control the Arm. So the question has become - How do I program it in Python from scratch? Well, the honest answer is I don't I use what others have done before. A good starting point is this site http://www.wikihow.com/Use-a-USB-Robotic-Arm-with-a-Raspberry-Pi-(Maplin), it gives most (pretty much all) of the answer, including where to get the pyusb library need; setting it up (be careful don't use the zip file but the tar.gz version - you might need to scroll down the screen to do this) and an example. A second source that was very useful was http://notbrainsurgery.livejournal.com/38622.html?view=93150#t93150 which contains an explanation of the 'triples' (for example [32,0,0]) used to select which part of the arm moves and what it does (in the example [32,0,0] causes the Robot Elbow to move down). The code below is largely based on the code in http://www.wikihow.com/Use-a-USB-Robotic-Arm-with-a-Raspberry-Pi-(Maplin) the only real changes are named procedures (such as ElbowUp) in place of the slightly less easy to understand lines such as MoveArm(Duration,[4,0,0]) #wrist up . The only other changes was a procedure that changes what the light does (0 - light off; 1 - light on; 3 - pulses by a number of times).
#Stop the movement after waiting a specified duration
time.sleep(Duration)
ArmCmd=[0,0,0]
RoboArm.ctrl_transfer(0x40,6,0x100,0,ArmCmd,3)
def RotateBaseClockwise(Duration):
MoveArm(Duration,[0,1,0]) #Rotate base clockwise
def RotateBaseAntiClockwise(Duration):
MoveArm(Duration,[0,2,0]) #Rotate base clockwise
def ElbowUp(Duration):
MoveArm(Duration,[16,0,0]) #Elbow up 0x10
def ElbowDown(Duration):
MoveArm(Duration,[32,0,0]) #Elbow down 0x20
def WristUp(Duration):
MoveArm(Duration,[4,0,0]) #wrist up 0x04
def WristDown(Duration):
MoveArm(Duration,[8,0,0]) #wrist down 0x08
def CloseGripper(Duration):
MoveArm(Duration,[1,0,0]) #close gripper 0x01
def OpenGripper(Duration):
MoveArm(Duration,[2,0,0]) #open gripper 0x02
def ShoulderUp(Duration):
MoveArm(Duration,[64,0,0]) #shoulder up 0x40
def ShoulderDown(Duration):
MoveArm(Duration,[128,0,0]) #shoulder down 0x80
def GripLight(Action, Duration):
if (Action==1):
MoveArm(Duration,[0,0,1]) #light on
if (Action==0):
MoveArm(Duration,[0,0,0]) #light off
if (Action==3):
for x in range(Duration):
MoveArm(1,[0,0,1]) #light on
MoveArm(1,[0,0,0]) #light off
WristUp(0.5)
OpenGripper(0.5)
RotateBaseClockwise(2)
RotateBaseAntiClockwise(2)
ElbowUp(1)
ElbowDown(1)
WristDown(0.5)
CloseGripper(0.5)
ShoulderUp(3)
ShoulderDown(1)
GripLight(3,3)
See it action in the video below.
All opinions in this blog are the Author's and should not in any way be seen as reflecting the views of any organisation the Author has any association with.
Santander UK recently provided the funding for a project I have want to do for a while; to loan robot arm kits, which are pretty much self-contained, out to schools to see what they come up with. The idea being to provide the kit for a year and the schools taking part write a blog post (or more than one), sharing what they have done.
The chosen kit is the CBiS Education robot arm hub because it comes with the robot arm, cables, raspberry pi, etc as well as screen, keyboard and mouse in one go (see the picture above).
The kits should start going out some of the schools next week.
I am grateful to Santander UK for the funding; CBiS Education for their support and advice so far; last but not least the schools who have enthusiastically expressed an interest in taking part.
All opinions in this blog are the Author's and should not in any way be seen as reflecting the views of any organisation the Author has any association with.
It is not physical but CBiS Education have release a free robot arm simulator for Scratch. Downloadable from their site http://www.cbinfosystems.com/cardboard2code_module2.aspx - it includes a Scratch project, guidance on Scratch along with an exercises in using the robot arm simulation and an exercise with teacher's guidance. Left my son with it, asked him if he could make it do something if a new sprite is added and the gripper touched it (similar to the exercise in the notes). He went on to produce a sprite that when it is touched by the gripper, went on to change colour a few times. I could see this being potentially used in Coding Clubs within schools.
All opinions in this blog are the Author's and should not in any way be seen as reflecting the views of any organisation the Author has any association with.