
UFO detects light

In a previous post (UFO has Landed)  I started playing with the CBiSEducation's UFO Consumable Robotics. Now I am going to play with it a bit more and add the light sensor, included in the kit, to it;is so it can detect different light levels. Again it is controlled using the Micro:Bit.

Stage 1 - Decorating it
The kit comes with some stickers so I added a few.

Stage 2 Wiring
Pins 0 and 1 are outputs to the LEDs
Pin 2 is the input from the light sensor
The red lead from the light sensor connects to 3v and the grounds to the ground.
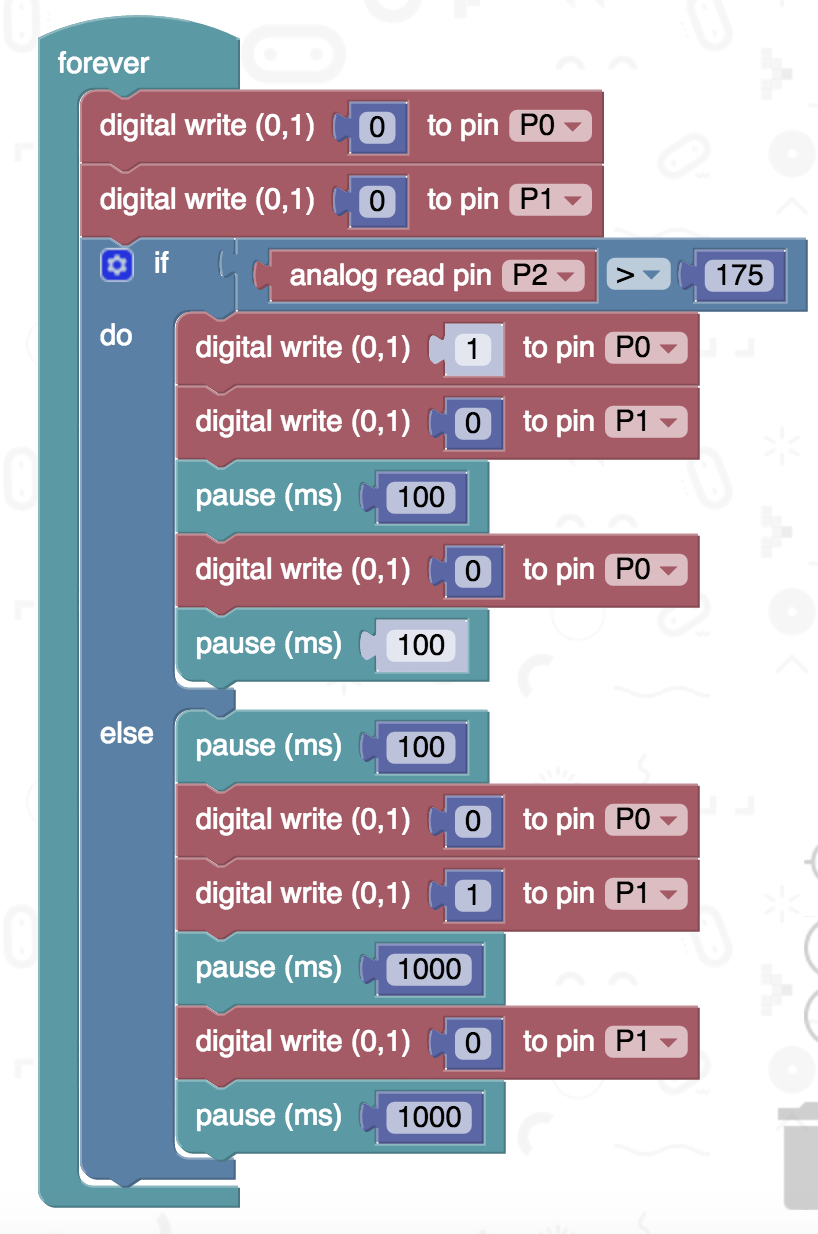

Stage 3 Code

The light sensor works more as a low light level detector, the darker the higher the value returned (in this case) on pin 2. So in low light level,  the LEDs flash relatively quickly, when the light level rises half of the LEDs start to pulse more slowly.


All opinions in this blog are the Author's and should not in any way be seen as reflecting the views of any organisation the Author has any association with.

Comments

Popular posts from this blog

Robot Software

In the previous blog posts for this 'series' "It is a good time...."  Post 1  looked at the hardware unpinning some of this positive rise in robots; Post 2  looked at social robots; Post 3  looked at a collection of small robots; Post 4 looked at further examples of small robots Robots, such as the forthcoming Buddy and JIBO, will be based some established open sourceand other technologies. Jibo will be based around various technologies including Electron and JavaScript (for more details see:  http://blog.jibo.com/2015/07/29/jibo-making-development-readily-accessible-to-all-developers/ ). Buddy is expected to be developed around tools for Unity3d, Arduino and OpenCV, and support Python, C++, C#, Java and JavaScript (for more details see http://www.roboticstrends.com/article/customize_your_buddy_companion_robot_with_this_software_development_kit ).  This post contin ues with some of the software being used with the smaller robots.  A number ...

Speech Recognition in Scratch 3 - turning Hello into Bonjour!

The Raspberry Pi Foundation recently released a programming activity Alien Language , with support Dale from Machine Learning for Kids , that is a brilliant use of Scratch 3 - Speech Recognition to control a sprite in an alien language. Do the activity, and it is very much worth doing, and it will make sense! I  would also recommend going to the  machinelearningforkids.co.uk   site anyway it is full of exciting things to do (for example loads of activities  https://machinelearningforkids.co.uk/#!/worksheets  ) . Scratch 3 has lots of extensions that are accessible through the Extension button in the Scratch 3 editor (see below) which add new fun new blocks to play with. The critical thing for this post is  Machine Learning for Kids  have created a Scratch 3 template with their own extensions for Scratch 3 within it  https://machinelearningforkids.co.uk/scratch3/ . One of which is a Speech to Text extension (see below). You must use this one ...

Scratch and web-cams in Scratch 3

Scratch 3 was launched on 2nd January 2019, so I wanted to know would Webcams still work with Scratch 3 as it did with Scratch 2. For example, in a previous post  Scratch, webcams, cats and explosions  the cat (Scratch) moved across the screen and a button burst when the object moved in the camera onto it.  Can the same thing be done in Scratch 3? The short answer is yes, but it is done slightly differently. The first change the video capture is not there in the blocks automatically; but is an extension that needs to be added. First, you need to add the extension blocks for video sensing. Go to the little icon at the bottom left of the screen (as shown below) this takes you to the extensions menu. Next, find the Video Sensing option and selected. The webcam, if enabled, with start automatically. A video sensing set of blocks is now in the list of block options.  The rest is very similar to doing this in Scratch 2. Moving ...