Tuesday 17 December 2019

Playing with Adafruit Circuit Playground BlueFruit


It is always a moment of excitement (perhaps I need to get a life) when the Adafruit Adabox arrives, this time is no exception with the arrival of the Adabox014. Inside there was a great mixture of things for making snow globes based around two devices TFT Gizmo and the Circuit Playground Bluefruit; this post is considered with an initial play with the Bluefruit.

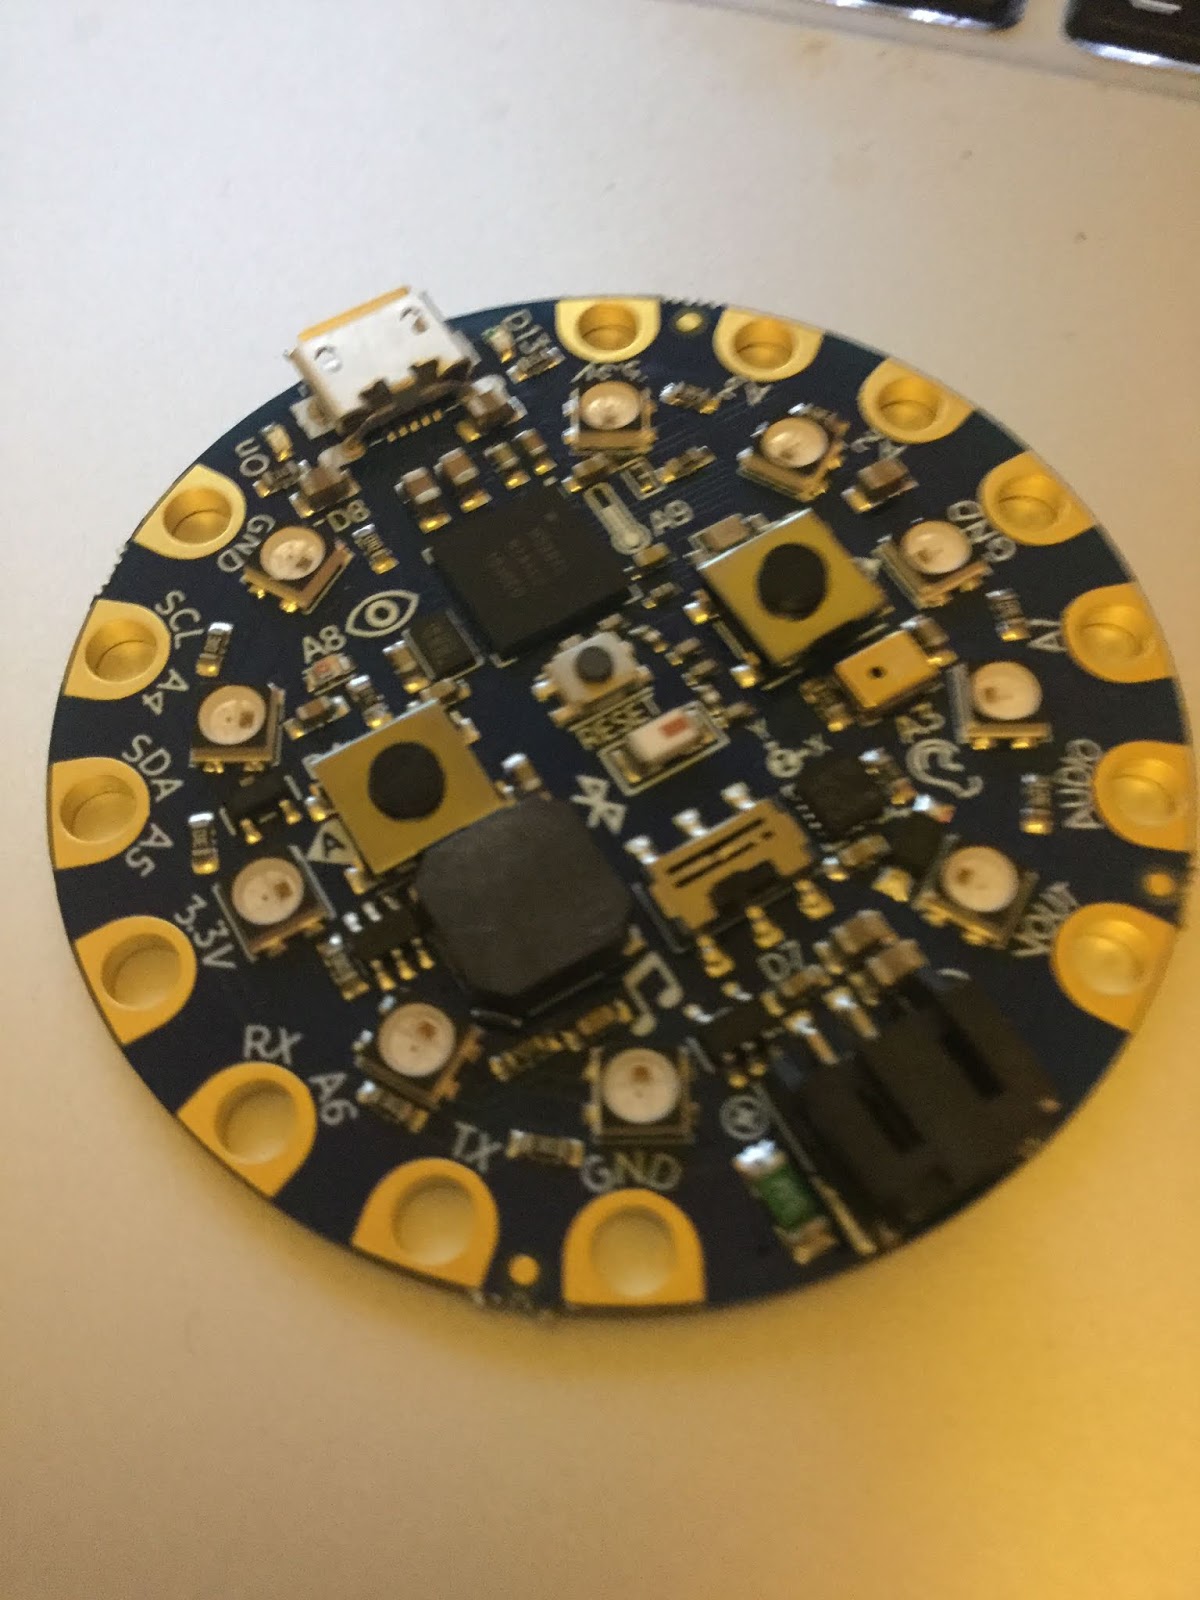
Bluefruit is a small Circuit playground with the addition of Bluetooth or more accurately Bluetooth Low Energy (BLE). If you have played with the Playground express it is very similar. To experiment I wanted to play with the neopixels on the board through Circuit Python, 


The starting point https://learn.adafruit.com/adafruit-circuit-playground-bluefruit/overview to get a bit of background and then to follow the links to how to get it all happening with Circuit.


Task I wanted was to use it, using circuitpython on the Mu editor to control random colours cycling through all the neopixels and in reverse order turn off (the code used is near the end of the post- please feel free to use it, if it is of use. A video at the end show the board in action.

Adafruit have provided a great starting point with the post at https://learn.adafruit.com/adafruit-circuit-playground-bluefruit/circuitpython-neopixel, in fact, I am using part of the code for the initial cycling through the pixels for my solution and modified version to turn the pixels off in reverse order. You will need to add neopixel,mpy available from https://circuitpython.org/libraries to lib folder on the Bluefruit but that is just a drag and drop exercise, name the routine code.py save with the board attached and that is really it.


In summary, this is a cool little board, very much in-line with the previous Circuit Playground boards and I looking forward to playing with it a bit more. The fact it can be programmed in different languages (as could the other boards) including the friendly MakeCode makes it interesting.


All opinions in this blog are the Author's and should not in any way be seen as reflecting the views of any organisation the Author has any association with. Twitter @scottturneruon

Monday 9 December 2019

Sphero RVR


Sphero have a track record of making well sort of fast spherical robots (along with a few Star Wars ones) in a recent kickstarter campaign they have a released a tracked robot  https://www.kickstarter.com/projects/sphero/sphero-rvr-the-go-anywhere-do-anything-programmabl/description - RVR and it is still fast and fun.  


It does seem to be a step up, they are allowing more customisation with a expansion port and on-board power, aimed at connecting other pieces of hardware, for example, Microbit and Raspberry Pis.Even without these it is not short of sensors and lights 


The simplest way to program it is still through the Sphero Edu App and its block programming providing a quick way to get going.


This feels (to me) like a move towards the more 'traditional' robot hobbyists market - and that is fine. It comes almost completely built, so it is soon ready to go out of the box which is nice. I am interested to see what resources will be provided by Sphero through their Sphero Developer Site (https://sdk.sphero.com/), there are already some cool looking sample projects on the site https://sdk.sphero.com/samples/. So in all, I think well worth a look.


All opinions in this blog are the Author's and should not in any way be seen as reflecting the views of any organisation the Author has any association with. Twitter @scottturneruon

Monday 2 December 2019

Free Web based Augmented Reality (AR)

This post is part of the materials for a session on Augmented Reality presenting at the 2019 SolSTICE eLearning and CLT Conference 5-6th June 2019 Edge Hill University https://www.edgehill.ac.uk/solstice/files/2019/05/2019-Book-of-Abstracts.pdf  and the #MergedFutures Event on 14th June 2019.
1. Introduction


So if we go to

Using the markers above with this url running on your device (with a camera enabled) it should add two new objects over the markers. you will need a copy of these images and printed them out. If you have it I would suggest running it in Firefox.


2. Getting Started
The guide for all this is https://aframe.io/blog/arjs/, with this you have pretty much everything you need.


To start your own go to https://glitch.com/ -> new project ->Hello World project

In the index.html deleted everything in there and replace it with

Should have a white box over the Hiro marker when the web camera/phone/tablet is shown the markers.


The code  not in bold below just sets it up - to play with it we don’t need to worry about what it does - we can just use it. The bit in bold is the bit initially we change or add to – in this case it puts a default white box over the marker.


3. Playing with other objects

Now if we replace


With


We get a blue ball in place of the box


Now for some fun
http://www.pngall.com/bee-png/download/84 is a bee image – download it


Go back to Glitch, and if we go to assets we can add the image. Open up the folder that has the downloaded image and drag it into the asset window.

When it stops downloading and shows the image, click on the image to get the new web address we are going to need that next. so take a copy of it.

If we replace


With the following by just adding in src="https://cdn.glitch.com/04b86bba-0978-4bf4-b3a7-2ece72336f90%2FBee-PNG.png" as below


We get a blue ball with a bee stretched over it. But it doesn’t look that great if we remove the color=”blue” we see the bee stuck at the bottom of the ball still but the colours are back.


Now if we replace


With commands to rotate the sphere


We get a rotating sphere with the image on it.

This can be found at https://simplistic-wakeboard.glitch.me and works with the Hiro marker


If you want to find out how I felt about presenting go to https://dandy-custard.glitch.me/


Now let's try a GIF


Download the GIF and then copy (drag and drop) into the asset folder of your project  get the web address and put into src=”” in place of the one that is there already

An example can be found at https://root-reply.glitch.me/ and works with the Hiro marker.


4. Issues and Thoughts

  • Make sure all the markers have white space surrounding them.


  • If I am honest, the technology is cool and useful for educational use, but I not sure where it all can go.   The question is what can others come up with to use it, I would love to hear about it.


Related Links


All opinions in this blog are the Author's and should not in any way be seen as reflecting the views of any organisation the Author has any association with. Twitter @scottturneruon

Sunday 10 November 2019

picoh -cute and fun OhBot

The OhBot company has recently released a slightly different version to their OhBot - Picoh (https://www.ohbot.co.uk/picoh.html); a cute small robot head. This is a just a short post about some initial playing with the Picoh OhBot.


Windows
I started playing the windows based blocks (see below) programming used for programming the ohbot. Very scratch-like language but packed with lots of features. The program that loads automatically takes you through loads of the features .


Python
I wanted to know if I can use it with a Mac as well. The blocks are not available for a Mac but a Python-based approach is (https://www.ohbot.co.uk/picoh-for-python.html) . Set-up instructions are good, starting from the GitHub site https://github.com/ohbot/picoh-python, the README file is useful including links to setting up for a Mac and links to example programs. Thonny is my prefered IDE for running Python in this case - just for the ease of use really. Mainly I have played with the example programs so far.


Thoughts 
A cool little robot, nice that it can be used on Windows, Mac, Linux/Pi. In the Picho-Python github site, there are some interesting examples, including one that links, Picoh, Wolfram Alpha and Wikipedia - curious about that one.


All opinions in this blog are the Author's and should not in any way be seen as reflecting the views of any organisation the Author has any association with. Twitter @scottturneruon

Friday 1 November 2019

Top 10 read post on Robots and Physical Computing blog during October 2019


Popular Posts


All opinions in this blog are the Author's and should not in any way be seen as reflecting the views of any organisation the Author has any association with. Twitter @scottturneruon

Monday 30 September 2019

Most read posts on Robots and Physical Computing blog in September 2019

Popular Posts


All opinions in this blog are the Author's and should not in any way be seen as reflecting the views of any organisation the Author has any association with. Twitter @scottturneruon

Sunday 22 September 2019

Moving Eyes with an Adafruit Adabox kit


One of the things I enjoy is a subscription to Adabox from Adafruit, receiving the box and very soon before that finding out what the main item is the box is a treat. The latest, at the time of writing, is AdaBox 13 with the MONSTER M4SK a set of small screens, based around 240x240 IPS TFT displays, acting as moving eyes in a mask, along with a couple of masks, speaker, microphone, lenses, etc and craft materials for decorating a mask - a full list can be found here.


My goal was, to play with this, was to create a slightly creepy mask where the eyes move - a simple build but fun to do. The Adafruit quick start guide for this (available here) provides all the instructions on setting it and downloading the different sets of eyes (that is really creepy to write). A set of different graphics files are already available for different sets of eyes;  a couple of examples are shown below. 


One suggestion is when you download the files for the eyes - still creepy - keep a copy elsewhere, in one case I accidentally delete the configuration file I want so it was handy to have a backup.  


Two masks are included in the box, being lazy, I choose the already decorated silvery mask to use. Along with the M4SK device, a set of lenses and holders are included. I struggled a bit with fixing the lenses into the holder and attach to the device - in the end, I choose to leave them out and stick the M4SK to the mask without them. A video of the mask in action is shown below.


There is much to explore with the Monster M4SK including a number of sensors already on the board including a capacitive touch sensor, buttons, a light sensor, a port for connecting a PDM microphone (included in the AdaBox 13). and three other ports. Sound effects can be played from a headphone socket or via a built-in amp driving an 8-ohm 1W speaker (also included in the Adabox). A Lipoly battery can be connected. A guide to getting going via the Arduino IDE is available here.


Related links


All opinions in this blog are the Author's and should not in any way be seen as reflecting the views of any organisation the Author has any association with. Twitter @scottturneruon

Top posts on this blog in March 2024

The Top 10 viewed post on this blog in March 2024. Covering areas such as small robots, augmented reality, Scratch programming, robots. Micr...