Wednesday 8 August 2018

Scratch 3 that microbit

The Beta version of Scratch 3 (https://scratch.mit.edu/microbit) allows certain physical computing devices to interact with the Scratch; including the micro:bit. This post looks at a little experiment with the micro:bit; producing a pen that moves around the screen controlled by tilting a micro:bit.


Set-up
In the video above an example of the pen moving under micro:bit control is shown. Also, some discussion of setting up Scratch to work with the micro:bit is included. The best source for the instructions to set up the micro:bit/Scratch combination and the links needed is https://scratch.mit.edu/microbit. The key features are:
- The programming of the Micro:bit via Scratch is not done by downloading a new .hex file each time as you do with the python or the javascript blocks but is done through the Scratch Link which has to be run separately to the Scratch editor each time you have a session using Scratch and the Micro:bit. There is a version for both windows and OS X.
- One program/hex file is downloaded on to the micro:bit to form the link between the micro:bit and scratch.


Microbit and Pens
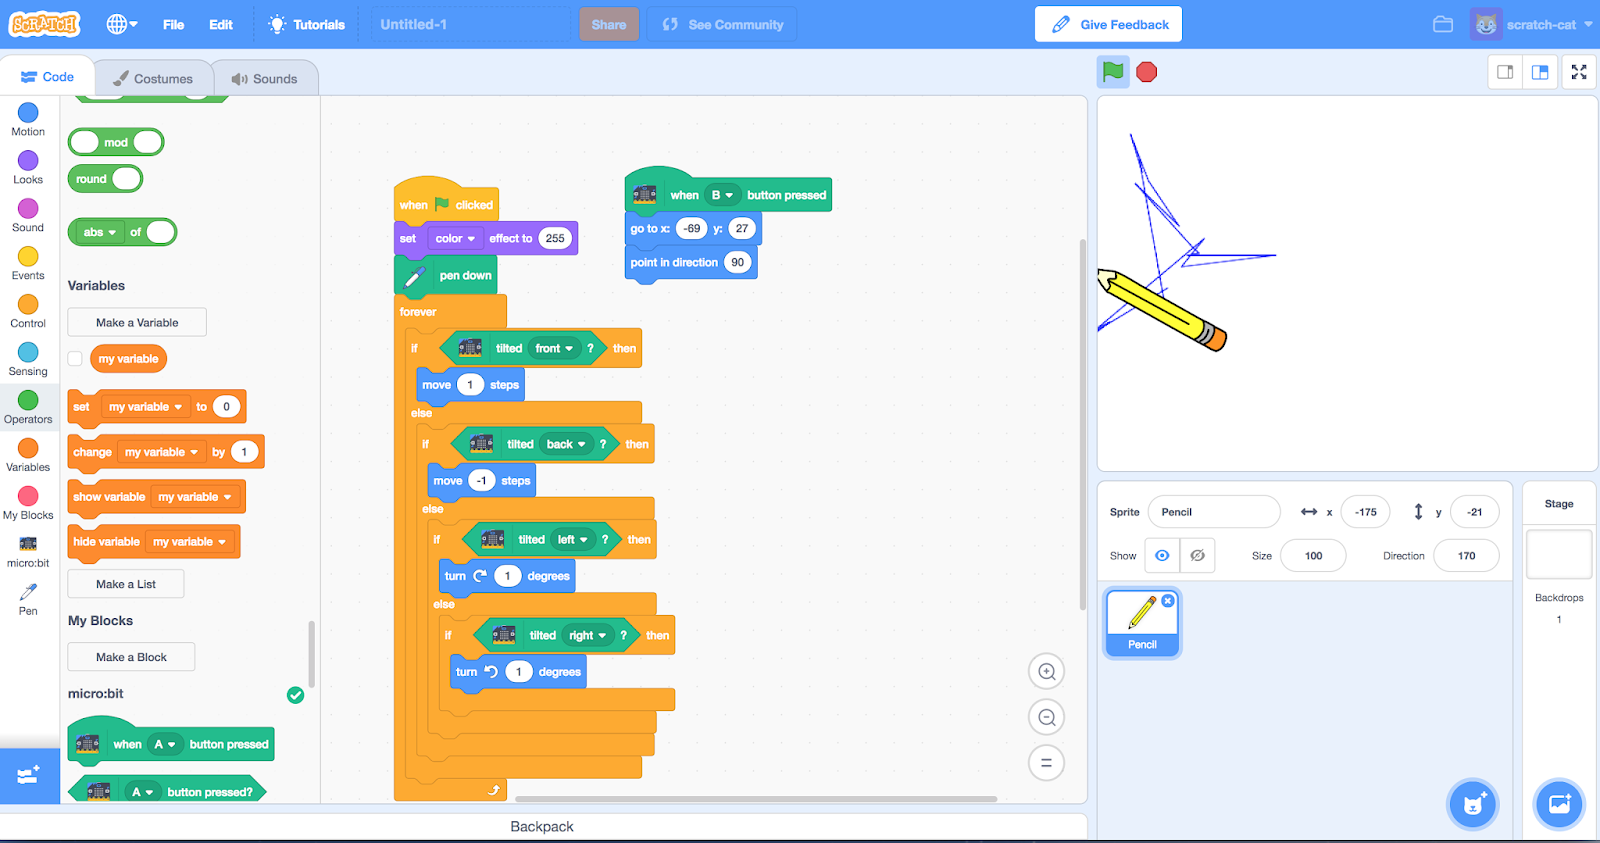
The experiment was to get a micro:bit to control a pen around the screen and draw (the video above shows the pen moving around under micro:bit control but not drawing).


The key to all of this the little blue icon at bottom left of the editor; this allows extra blocks/features to be added. You first need to connect a micro:bit; click on the blue icon and select the micro:bit option and attach a micro:bit to your machine, the system should (hopefully) allow you to make a connection. As well as the micro:bit blocks you will need to add the pen blocks via the blue icon and the pen option.
The code (see below) does two basic things
- Press button B on the micro:bit resets the pen to a fixed starting point;
- Tilting the micro:bit forwards and backwards (once the green flag has been pressed) moves the pen forward or backwards in the direction that the pen is facing and tilting left or right turns the pen.


At the moment the pen is drawing as if the nib is in the middle of the pen (see below) but tilting the micro:bit does give rough control. It is fun, to mix Scratch and micro:bit.


All opinions in this blog are the Author's and should not in any way be seen as reflecting the views of any organisation the Author has any association with. Twitter @scottturneruon

Friday 3 August 2018

Crabby but fun

Just started playing with one of BinaryBots latest Totem robots - Crab https://www.binarybots.co.uk/crab.aspx, which as the name suggests is a crab-like robot kit with controllable via a Microbit a claw. 

It is early days playing at the moment, but some initial thoughts. You get a solid looking (and is solid) robot when it is built via a 'meccano-esque ' like construction material - Totem . A brief note on the Totem system is it is nice to build with, the design around the square nuts mean they slot into the structs and stay there - a nice feature, and the all the tools needed to build the structure come with the kit. The only thing missing from the kit is the micro:bit, but if you buying the kit you probably already have one (or more) microbits; or you can get one at the same time as buying the kit.

Two boards come with the kit. First one, the power board, has the battery holder and connections for motors. The second the BinaryBot sensor board has number of features I have yet to explore including two capacitive touch sensors, 4 addressable LEDs, light sensor, vibramotor for producing vibrations and a buzzer.


Playing so far!
After building it the Crab, I have mainly been playing with using the javascript blocks to control the opening and closing of the claw. Simple routine below,   controls the claw: open (and display an o on the microbit) or close the claw 9and display a c on the microbit), depending on whether button B or A is pressed.


It is fun, and works. Looking at the two boards though finding the pin numbers, etc to add motors access the sensors is where the real fun is going to begin.


Some ideas initial ideas for where next
- Play with python to program it.
- The Vibramotor included may not be powerful enough to do the next idea - make it move by vibration. The sturdy structure means the stronger vibrations may needed to make it move. Nice thing about the kit is the construction is sturdy so it should be able to take the stronger vibrations by adding more larger vibrating motors (to see the kind of thing I mean see: https://medium.com/@scottturneruon/crumble-junk-eggbot-db0a1d02595f ). There is room on the power board for connecting motors.
- Getting the claw to react to light.

I am looking forward to playing with it a bit more!


All opinions in this blog are the Author's and should not in any way be seen as reflecting the views of any organisation the Author has any association with. Twitter @scottturneruon

Saturday 14 July 2018

WebVR 4 Playtime: Putting Objects into Augmented Reality

In a previous post, I tried to persuade you that using A-Frame it is not too hard to use for some simple Augmented Reality (AR) for free, via a browser, but also runs on a mobile device. Well I going to continue and put objects with images imposed on them into this AR system - which could be quite a quick way to get an organisations logo into AR.


Summary
In the first post WebVR playtime 1: Basics of setting up, images and rotating blocksI looked at setting up a scene, rotating an object.  Second post, recapped the basics, then look at adding video, 360 degree video, and models developed elsewhere. The third post started looking at using WebVR as part of an augmented reality solution building on the great resource Creating Augmented Reality with AR.js and A-Frame by Jerome Etienne, creator of AR.js. This gave us the starting code. 

In this post, the ideas are extended further to adding or wrapping images on top of an object.


Adding images to objects
In a previous post (WebVR playtime 1: Basics of setting up, images and rotating blocks) we have seen that in A-Frame if you create a block and in the tag for the block you add an image it gets wrapped on to the block.

As an example in the following code <a-sphere position="0 0.5 -.5" radius=".5" color="yellow" src="test1.png"> a yellow sphere of 0.5 units radius is produced with the image, stored in test1.png, wrapped around the sphere. What makes this effect even more interesting is any white on the image gets replaced by the underlying colour, yellow in this case, of the object. Change the underlying colour and the image can look different.

The way the image is mapped on to the objects, changes with the object. If the object had been a box all the sides would have a copy of the image on them. A sphere and box of different colours will be used to show these effects.

In this exercise, I went back to using Mozilla's Thimble because it allows images to be added into the file area easily and I was having problems with some other editors getting images to work. The slight downside is the automatic viewing of site, doesn't work with the camera; this though is easily worked around by publishing the site and viewing it as a live webpage (to see an example using the Hiro marker (same one as used in the previous post) go to https://thimbleprojects.org/scottturneruon/517091).

Ok, so what does this code look like and do? Let's look at the code for the example just discussed https://thimbleprojects.org/scottturneruon/517091 ), which has some text; but also a white box and yellow sphere that have the same image mapped onto them.

<!DOCTYPE html>
<html>
  <head>
    <meta charset="utf-8">
    <meta name="viewport" content="width=device-width, initial-scale=1">
    <title>AR and  WebVR using AFrame</title>
    <link rel="stylesheet" href="style.css">
    <script src="https://aframe.io/releases/0.7.0/aframe.min.js"></script>
    <script src="https://jeromeetienne.github.io/AR.js/aframe/build/aframe-ar.js"></script>
  </head>
  <body>
    <a-scene>
      <a-entity position="-.5 0 2.5">
        <a-camera></a-camera>
      </a-entity>
      <a-text  value="UO" color="#FFF" position="-1 1.8 -0.5"  align="center" width="2.6">
        <a-text value="N" color="#FFF" position="0 -0.125 0" height="1" align="center">
        </a-text>
        <a-animation attribute="rotation" dur="10000" to="360 360 360" repeat="indefinite"></a-animation>
      </a-text>

      <a-box src="test1.png" height="0.75" position="0 0 -0.5" width="0.75" depth="0.75" >
        <a-sphere position="0 0.5 -.5" radius=".5" color="yellow" src="test1.png">
          <a-animation attribute="rotation" dur="7500" to="0 360 0" repeat="indefinite">
          </a-animation>
        </a-sphere>
        <a-animation attribute="rotation" dur="15000" to="360 360 360" repeat="indefinite">
        </a-animation>
      </a-box>
      <a-marker-camera preset="hiro"></a-marker-camera>
    </a-scene>
  </body>

</html>

Everything in the code has been discussed in the previous post but not put altogeher. It can be seen in action here, a still of the marker and AR in action and the short video showing the movement.


via GIPHY

The combination of block, sphere and text, appear when the marker is visible and started to rotate.


What next?

It would be interesting to explore adding actual icons to the blocks (copyright etc allowing) and create new markers other than the Hiro to use, including using the recognition of different markers to present different AR outputs.

The other area to explore further would be adding externally generated 3D models into the system.


To read more go to 


All opinions in this blog are the Author's and should not in any way be seen as reflecting the views of any organisation the Author has any association with. Twitter @scottturneruon

Wednesday 11 July 2018

WebVR 3 Playtime: Augmented Reality

I am going to try to persuade you that using A-Frame it is not hard to do some simple Augmented Reality (AR) for free, via a browser, but that also can run on a mobile device.


Introduction
This is part of a short series of articles about some experiments with WebVR Web-based Virtual Reality - in this case based on the wonderful A-Frame (https://aframe.io) . In the first post WebVR playtime 1: Basics of setting up, images and rotating blocksI looked at setting up a scene and then rotating an object. In the second post, recapped the basics, then look at adding video, 360 degree video, and models developed elsewhere.

In this post we are going to start looking at using WebVR as part of an augmented reality solution. I going to start by building on the great resource Creating Augmented Reality with AR.js and A-Frame by Jerome Etienne, creator of AR.js - the starting code below and the basis of the solution comes from that resource.


Getting started.
In the previous two posts I used Thimble from Mozilla, I had a problem with access my camera using Thimble so I switched to Glitch - you may need to register - and Codepen.io.

The code below was adapted from the Creating Augmented Reality with AR.js and A-Frame  page.
<!-- include A-Frame obviously -->
<script src="https://aframe.io/releases/0.6.0/aframe.min.js"></script>
<!-- include ar.js for A-Frame -->
<script src="https://jeromeetienne.github.io/AR.js/aframe/build/aframe-ar.js"></script>
<body style="margin : 0px; overflow: hidden;">
  <a-scene embedded arjs>
    <!-- create your content here. -->

    <!-- define a camera which will move according to the marker position -->
    <a-marker-camera preset="hiro"></a-marker-camera>
  </a-scene>

</body>
The first script line is the same as in the previous posts setting up the A-Frame WebVR. The second one  adds the additional functionality for  Augmented Reality via markers. The only other new feature is within the <a-scene></a-scene> tags, a new set of tags <a-marker-camera> saying which markers is being used; in this case, a preset one called Hiro (see below), which available in AR.js. 

A blue box and text were added to the scene - just in the same way as adding boxes and text in the first of this series. Shown in code pen below

Using the Hiro marker go to https://codepen.io/scottturneruon/pen/gKVWYq to play! 


Next Step
To take this forward I wanted to replace the text and box with some rotating text when the marker is visible. On the AR in action can be found at http://bit.ly/2N0nvWx; you will need the Hiro marker

The code for the AR in action is shown below.
<script src="https://jeromeetienne.github.io/AR.js/aframe/build/aframe-ar.js"></script>
<body style="margin : 0px; overflow: hidden;">
  <a-scene embedded arjs>
    <!-- create your content here. just a box for now -->
     <a-text  value="University of" color="blue" position="0 0.5 -0.5"  align="center" height="2"><a-animation attribute="rotation" dur="5000" to="360 0 0" direction="alternate"  repeat="indefinite"></a-animation>
      </a-text>
      <a-text value="Northampton" color="blue" position="0 0.325 0" height="3" align="center"><a-animation attribute="rotation" dur="5000" to="360 0 0" direction="alternate"  repeat="indefinite"></a-animation>
      </a-text>
    <!-- define a camera which will move according to the marker position -->
    <a-marker-camera preset="hiro"></a-marker-camera>
  </a-scene>

</body>


Where next
Adding images to objects and adding models are the next experiments.


To read more go to 


All opinions in this blog are the Author's and should not in any way be seen as reflecting the views of any organisation the Author has any association with. Twitter @scottturneruon

Wednesday 4 July 2018

Problem-solving for Social Good - Games in HE


On 26th June 2018 I was very pleased to talk about the work members of the Computing team at the University of Northampton have been involved in, around games within the teaching of problem-solving and programming.


The recent #WomenEd meeting, in Milton Keynes, organised by Anita Devi (@Butterflycolour), Anne Goldsmith (@AnneMGoldsmith) and Jay Rixon(@teaching_think) (focused on Games in Education and a lively discussion on this topic was had, after a number of presentations. Below are the slides to my presentation.


Some of the tweets from the event


Possibly usefully references


Turner, S. J. (2017) Junkbots - Crumble eggbot. Workshop presented to: Mozilla Festival, Ravensbourne College, London, 27-29 October 2017. Available at https://doi.org/10.6084/m9.figshare.5687425.v1


Hill, G. and Turner, S. J. (2014) Problems First, Second and Third. International Journal of Quality Assurance in Engineering and Technology Education (IJQAETE). 3(3), pp. 88-109. ISSN: 2155-496
https://doi.org/10.4018/ijqaete.2014070104
Hill G, Turner S (2011) Chapter 7 Problems First Software Industry-Oriented Education Practices and Curriculum Development: Experiences and Lessons edited by Drs. Matthew Hussey, Xiaofei Xu and Bing Wu. ISBN: 978-1609607975 IGI Global June 2011
https://doi.org/10.4018/978-1-60960-797-5.ch007

Turner S and Hill G(2008) "Robotics within the Teaching of Problem-Solving" ITALICS vol. 7 No. 1 June 2008 pp 108-119 ISSN 1473-7507 http://dx.doi.org/10.11120/ital.2008.07010108
https://doi.org/10.11120/ital.2008.07010108

All opinions in this blog are the Author's and should not in any way be seen as reflecting the views of any organisation the Author has any association with. Twitter @scottturneruon

Sunday 24 June 2018

Computing staff at Women into Engineering Day 19th June 2019


Some of the activities were lead by Computing staff at the University of Northampton's Women into Engineering Day on the 19th June 2019. Three activities were lead by the team
- Meet Red the Robot
-Blinking LEDs
- Web programming
Facilitated by Scott Turner, Liz Coulter-Smith and Iain Douglas.

Below are some of the tweets from the day


To hear To hear Red the Robot talk and dance a bit go to https://www.youtube.com/watch?v=cvF0Q8OVV9g


All opinions in this blog are the Author's and should not in any way be seen as reflecting the views of any organisation the Author has any association with. Twitter @scottturneruon

Thursday 10 May 2018

MSc meets Micro:Bit

I have recently been teaching a module on Internet Programming on a MSc Computing programme (see related links), and was looking for a way to introduce a little bit of physical computing to finish of the module - micro:bits offer a route.

So a bit of context; most of the students on the module had first degrees in either networking or software engineering; so before they start the module they are competent in programming with Javascript, HTML, CSS and PHP. Therefore the module looked to develop new areas such as introductory blockchainvirtual reality via the web (e.g. WebVR), using social media sources; but lastly looking at physical computing leading to an insight into the Internet of Things (IoT). As part of this last topic gaining some experience of programming and very simple networking was looked at using the micro:bit.

An activity was produced where:

  • they, in pairs, initially replicate some code and work out how it worked;
  • they then took the code and experimented with their own ideas.
In all cases they had to produce something that allowed doing something on one micro:bit, caused another micro:bit to do something in response.


Initially, javascript blocks (as above) were used and some students stuck with the graphical blocks, others moved into the text-based version. As far as the activity went it didn't matter; the main goals were to see the programming of a physical device via a web interface; to break a little mystique that it is as ways much harder to program physical devices and to get a bit of very simple networking going on.

Many of the students, started to investigate getting sounds to play on headphones and getting one micro:bit to trigger the other to play. One group went and started playing with python. 

Reflection bit - If I had similar, competent group again I would start this earlier; the level of engagement seemed high and the activities could then start developing towards IoT. Though, I admit to a bias for physical computing, it is appropriate in HE teaching; even using tools primarily designed for schools like the micro:bit.


Related Links
MSc Computing
MSc Computing (Computer Network Engineering)
MSc Computing (Software Engineering)


All opinions in this blog are the Author's and should not in any way be seen as reflecting the views of any organisation the Author has any association with. Twitter @scottturneruon

Top posts on this blog in March 2024

The Top 10 viewed post on this blog in March 2024. Covering areas such as small robots, augmented reality, Scratch programming, robots. Micr...