Thursday 21 January 2021

Tinkercad and Microbit: To make a neuron

The free online CAD (and so much more) package Tinkercad https://www.tinkercad.com/ under circuits; now has microbits as part of the list of basic components available to build circuits out of.

To have a quick play I wonder if using the built in Scratch=like code blocks, I could build a simulation of neuron on the microbit.

Requirements 
- By altering the bias, weights change the behaviour of buttons A and B
-when A is pressed a variable input1 is set to 1 and when released it goes to 0. The same happens for Button B and a variable input 2
- if (bias+weight1*input1+weight2*input2)>=0 then a T for True appears of the LEDs otherwise F for False is shown.

That is it really, apart initialising the variables. The code for producing an OR is shown below and the GIF at the end shows an AND in action:


The GIF below shows it action for an AND (bias is set to -2); change the bias to -1 and you would get an OR.


All opinions in this blog are the Author's and should not in any way be seen as reflecting the views of any organisation the Author has any association with. Twitter @scottturneruon

Saturday 2 January 2021

Playing with Marty the Robot: Set-up and go


This post forms part of occasional posts about playing  with Marty the Robot V2 (https://shop.robotical.io/products/marty-the-robot-v2) from Robotical. In this post I am going to do a quick look at initially setting it up and a bit of Scratch programming.


Set-up

I had a partially assembled version so most of the fiddly bits of putting the legs together etc were done; the instructions clearly make out the start of the instructions for building the partly assembled Marty. It is ready to build from the box including adding in a screwdriver. The only deviation I had to make from the build instructions was I having to partially disassemble the arm bit already done to fix the rest of the arm together - this was minor.


I am initially running this through an iphone and setting it up to do this was exceptionally easy to do and follow. 
  1. Download the app (just search for 'Marty the Robot' and found the right app), 
  2. pair it up with BlueTooth, 
  3. calibrate - just followed the instructions and it was fine.


Programming in Scratch

From the App there is an option to program in Scratch, just started it up and in the motion and sensing options there are blocks for Marty. Then it was just the same as other Scratch programming - an example is shown below.


Where next
Python, connecting to wifi and add some extras.


All opinions in this blog are the Author's and should not in any way be seen as reflecting the views of any organisation the Author has any association with. Twitter @scottturneruon

Friday 1 January 2021

Most viewed posts in December 2020 on the Robots and Physical Computing Blog

Popular Posts


All opinions in this blog are the Author's and should not in any way be seen as reflecting the views of any organisation the Author has any association with. Twitter @scottturneruon

Wednesday 23 December 2020

10 top read posts on Robots and Physical Computing blog in 2020

microbit and neopixel cube reacting to music


Please click on the links below for more details.

Popular Posts


All opinions in this blog are the Author's and should not in any way be seen as reflecting the views of any organisation the Author has any association with. Twitter @scottturneruon

Friday 11 December 2020

Cube and microbit reacting to music


In a previous post - 'Dancing' Snowman - ok flashing LEDs to music - I played with Microbit V2 with its built-in microphone in combination with a Ryan Walmsley's SnowPi RGB https://www.kickstarter.com/projects/ryanwalmsley/snowpi-rgb-edition to make a Snowman that reacts to music.

In this post, the aim is to show the idea been extended to a Cube of programmable LEDs the 4tronix's Cube:Bit. Essentially the process is the same as the previous post the microphone detects the sound level and cause an LED to light up. 

Only a few minor changes were made to the code from the previous example.
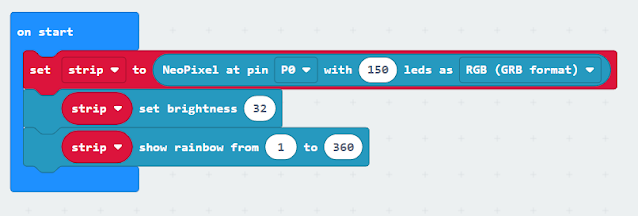
- The Pin had to be changed from 2 to 0 in the code (see Figure 1);
- Increase the number of pixels/LEDs in the settings (see Figure 1);
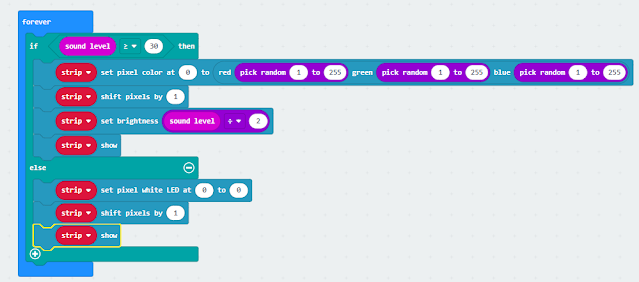
- It no longer chooses random LEDs/pixels to light up; but alters the first one and shifts the result to the result to the next one - so the lights shifts through the LEDs (see figure 2);
- Add in when it is quiet set the first LED to set a value and shift along (see figure 2)


Figure 1.


Figure 2


The code used is available at https://makecode.microbit.org/_3pT6zaRgy8T5 please feel to play and adapted and share your improvements.


The video below shows it in action:


All opinions in this blog are the Author's and should not in any way be seen as reflecting the views of any organisation the Author has any association with. Twitter @scottturneruon

Monday 30 November 2020

Popular post on this blog: November 2020


All opinions in this blog are the Author's and should not in any way be seen as reflecting the views of any organisation the Author has any association with. Twitter @scottturneruon

Sunday 8 November 2020

'Dancing' Snowman - ok flashing LEDs to music


This post discusses a project that I want to play with since finding out the new Microbit V2 has an built in microphone - this is to use the new microbit in combination with a Ryan Walmsley's SnowPi RGB https://www.kickstarter.com/projects/ryanwalmsley/snowpi-rgb-edition to make the snow,man change the LEDs as the music's volume changes via the microphone. First though, thank to you to the fabulous  Rachel @ItsAll_Geek2Me from Microbit Education Foundation for letting me have Microbits to play with.


So thehe starting point is the Snowman, essentially following the instructions at snowpi.xyz for setting it up and writing an initial program in makecode for the snowman. If fact the code in this project is a twist on the code found there.


You need to use https://makecode.microbit.org/beta#editor at the time of writing and add the neopixels extension (see snowpi.xyz for more details) Some new blocks in the current beta version of makecode add for the new microbit; including some new blocks for the microphone under inputs - a very useful resource for details on the new microbit and programming it is https://tech.microbit.org/latest-revision/ the microphone blocks are in the input section.
 
The code is availabe at https://makecode.microbit.org/_KDo9KghUhPbw  it is a bit hard to see the code in the images below.


If you do something more with this code please add a comment to the post.


All opinions in this blog are the Author's and should not in any way be seen as reflecting the views of any organisation the Author has any association with. Twitter @scottturneruon

Remote Data Logging with V1 Microbit

In an earlier post  https://robotsandphysicalcomputing.blogspot.com/2024/08/microbit-v1-datalogging.html  a single microbit was used to log ...