Saturday 25 April 2020

Programming Robots Virtually 1 - VEXcode VR

For a number of years, I have been playing with robots as a means of developing programming/coding skills with students. The problem is when classes get larger or it is used as part of an assessment there is very rarely enough robots to satisfy all the students Turner and Hill (2008). So
therefore, the search has been on for a tool that allows robots to be simulated, programmed, ideally web-based, free and simple to use. Lately, a number of interesting tools have arisen. In this series of posts, I am going to look at experimenting with a few of them. In this post, starting by looking at VEXCode VR - available at https://vr.vex.com/.


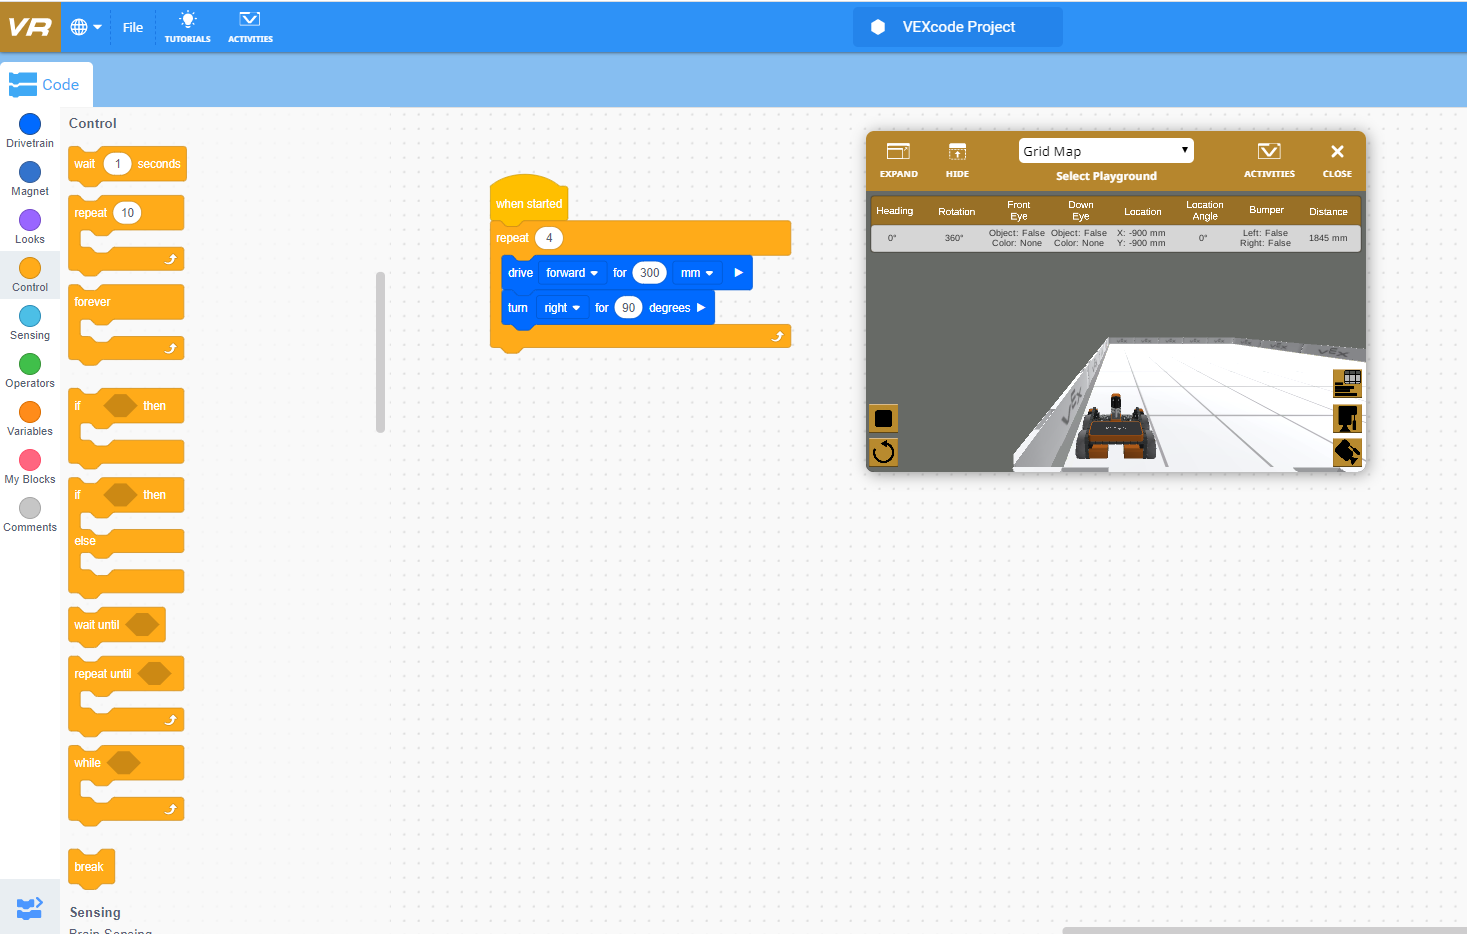
VEXcode VR https://vr.vex.com/  from VEX Robotics (https://www.vexrobotics.com/) is a simulator and programming tool for their Scratch-like programming tool VEXCode - at the time of writing is free. If you can do Scratch this is a nice next stage, consisting of the simulator (playground) and the programming environment (see below and the video above.)


Playgrounds
These are the simulated environments you can select from, with a two camera-views; downward camera for overhead view and angled camera to give a 3D view (as shown in the video) via buttons on the bottom right hand side of the playground. Also you can toggle, using the third button on the right hand side, the ability to see the status of the various sensors. There are a number of different playgrounds to play with. In this post I am going to use two of them


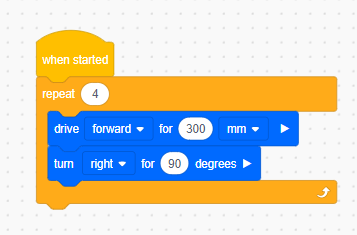
Example 1: The Square
Using the Grid Map playground and angled camera. I wanted to start with a stand-by; getting the robot to move in a square. The robot moves forward for 30mm and then turns right 90 degrees; and this is repeated 4 times (see below)
So the commands are very scratch-like. I was impressed,  the 3D gave a clear view it in action, the commands were intuitive and (yes repeating myself) very easy to transfer to from Scratch.


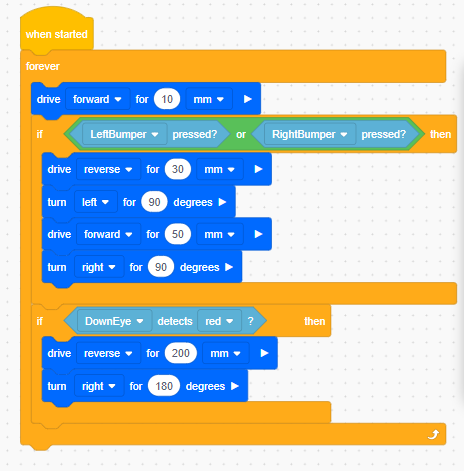
Example 2: Playing with Sensors a bit
Now for more fun, getting it to react to the environment a bit; by changing the Playground to Castle Crasher you get an environment that has simulated blocks and red perimeter to interact with. As you would hope, there are sensing blocks including LeftBumper and RightBumper - no guesrss for what they do and DownEye which can detect the red line. The code is simple and shown below, based on detecting the block using the bumpers, move to the side and recheck if  (shown  below) is if a  block is in-front and if not go forward. If it finds the red line reverse back and rotates 180 degrees.


As a side project I wondered what would happen if you didn't put code in to detect the red line, how would it cope with falling off the surface; it simulates it quite well showing it falling off which quite fun. One mistake I made initially is accidentally selecting the wrong form of turning action rotating when it should have been a turn.


Overview so far...
If you can already use movement, sensing and control blocks in Scratch, you can do this. Has potential as a source of online activity's, especially as the time of writing in the UK we are 'social-distancing'. In their paper Turner and Hill (2008) also highlighted that robots are a difficult resource to manage for a large class; this kind of option allows simulation and programming of a robot to be tried out without actually having the robot. Most importantly it is fun.


Reference
Turner S and Hill G(2008) "Robots within the Teaching of Problem-Solving" ITALICS vol. 7 No. 1 June 2008 pp 108-119 ISSN 1473-7507 https://doi.org/10.11120/ital.2008.07010108


All opinions in this blog are the Author's and should not in any way be seen as reflecting the views of any organisation the Author has any association with. Twitter @scottturneruon

Friday 3 April 2020

BBC micro bot - tweeting BBC Basic (updated)


I assume others have been playing with it for a while, but yesterday I can across the BBC Mirco Bot site https://www.8bitkick.cc/bbc-micro-bot.html - where you tweet @bbcmicrobot and run BBC Basic code on BBC Micro emulator. It returns a video of your code running. 

For those of us, who either had (I didn't - ahh) or wanted a BBC Micro (that is me) it is a cool thing; combining tweeting and programming on one go.

I had a go yesterday

This was returned


Have a go it is fun.


All opinions in this blog are the Author's and should not in any way be seen as reflecting the views of any organisation the Author has any association with. Twitter @scottturneruon

Wednesday 11 March 2020

Podcast physical computing, IoT, Industry 4.0 and others


I was lucky recently to invited to participate in a podcast on wide-ranging topics with Drs Michael Opuku Agyeman and Triantafyllos Kanakis. The discussion roamed around computing, physical aspects of computing, social benefits of technologies, industry 4.0, our research and a whole lot more. Good fun.

The podcast can be found below:


All opinions in this blog are the Author's and should not in any way be seen as reflecting the views of any organisation the Author has any association with. Twitter @scottturneruon

Tuesday 3 March 2020

Top read post on Blog in Feb 2020


Popular Posts

Search This Bl


All opinions in this blog are the Author's and should not in any way be seen as reflecting the views of any organisation the Author has any association with. Twitter @scottturneruon

Friday 31 January 2020

Top 10 read posts on the Robots and Physical Computing blog - January 2020


Popular Posts


All opinions in this blog are the Author's and should not in any way be seen as reflecting the views of any organisation the Author has any association with. Twitter @scottturneruon

Saturday 28 December 2019

Adafruit PyPortal from Twitter to weather

I have had the Adafruit PyPortal for a while and finally got around to playing with it. The PyPortal cames as part the Adabox011 


1. Getting going

PyPortal contains a colour TFT touch screen; speaker; NeoPixel; sensors for light and temperature sensor;  microSD slot; ports for I2C and pins for either analogue or digital; with built-in 8MB flash memory. It uses both CircuitPython and Arduino. In this post, CircuitPython is used. A more detailed overview of the device is available at https://learn.adafruit.com/adafruit-pyportal 

To set it up I started from https://learn.adafruit.com/adafruit-pyportal/updating-your-pyportal, I already had CircuitPython installed so skipped ahead after updating the firmware to PyPortal CircuitPython Setup and then the enjoyable bit Internet Connect! 


2 From Twitter to Weather
Time to play. There is an interesting example, developed by John Parks (https://learn.adafruit.com/users/johnpark) PyPortal Twitter Follows Trophy (https://learn.adafruit.com/pyportal-twitter-follows-trophy) which turns the PyPortal into a 'scoreboard' for twitter follows. The first few sections describing setting the system up in terms of CircuitPython, internet connection and updating the firmware, similar to the links above. The code starts at https://learn.adafruit.com/pyportal-twitter-follows-trophy/code-pyportal-with-circuitpython the description is really useful and essentially uses JSON information about followers and displays it on the PyPortal.

Using this code as the core of a new project, the device was changed to collect weather data for the current weather (and yes I do know I can just look out of the window but this seems like fun) from a website. 

To get started a source of the data was needed and a company Weather Unlocked: https://developer.weatherunlocked.com/ provides a service for local current weather information via their 'Local Weather API' in JSON form.  You need to sign in and create an APP_ID and APP_KEY, these are needed in the next stage. In the code, modify DATA_SOURCE = "https://cdn.syndication.twimg.com/widgets/followbutton/info.json?screen_names="+TWITTER_NAME to something like DATA_SOURCE = "http://api.weatherunlocked.com/api/current/51.50,-0.12?app_id={APP_ID}&app_key={APP_KEY}" with APP_ID and APP_KEY substituted and 51.50,-0.12 changed to the longitude and Latitude of your choice.

Using the URL Code Beautify (https://codebeautify.org/jsonviewer) and you can look at the JSON output to get a sense of how the data is structured and see the information produced.
There is a weather description wx_desc, so the code was changed to use DATA_LOCATION = ["wx_desc"] the rest is minor tweaks on the original John Parks code.


Change to DATA_LOCATION = ["temp_c"] and get (not surprsingly) the temperature.

The code used is here:


3. Overview
I enjoyed playing with this so far and look forward to playing with it a bit more. Thank you to John Parks for such a good starting point and WeatherUnlocked for such a useful feed.


All opinions in this blog are the Author's and should not in any way be seen as reflecting the views of any organisation the Author has any association with. Twitter @scottturneruon

Monday 23 December 2019

Most popular post on the Robots and Physical computing Blog in 2019


The top 10 most popular posts viewed during 2019


Popular Posts


All opinions in this blog are the Author's and should not in any way be seen as reflecting the views of any organisation the Author has any association with. Twitter @scottturneruon

Top posts on this blog in March 2024

The Top 10 viewed post on this blog in March 2024. Covering areas such as small robots, augmented reality, Scratch programming, robots. Micr...