I have recently taken two robots to a Code Club, here are a couple of reflections/observations. Cozmo This robot produced by Anki is incredibly cute - a cross between Wall-E and a pet in some respects.
The code below was produced by the 'Code-Clubbers' and gets Cozmo to speak move around and operate its forks at the front. Anecdotally, someone was trying to work on something but couldn't resist coming and having another look at what it was doing.
Ohbot
Ohbot provided a different opportunity to play with a robot, getting to move the mouth, speak and track faces. My first impression was some of the children were a bit wary, until they found out they could control what it says and that seemed to break the ice. All opinions in this blog are the Author's and should not in any way be seen as reflecting the views of any organisation the Author has any association with. Twitter @scottturneruon
The incredibly cute robot Cozmo became even more engaging recently with the ability to program it. A recent update to the Cozmo app (see related links) to include Code Lab allowing programming of Cozmo through of a graphical programming approach based on Scratch Blocks.
An example of the code is shown below, getting Cozmo to:
Start moving around
Wait until it see a face
Says Hi Everybody
Moves forward
Sounds like a cat
Looks down and then raises it's forks
Acts 'grumpy'
Acts 'happy'
The video at the end shows this in action. It is an easy to use tool and with a lot of the Cozmo actions available in the blocks, put a few blocks together and very quickly you have Cozmo doing some interesting and often funny actions. Is it very flexible, no; but it is not meant to be - it is meant to be easy to use and it is and great fun.Personally, I felt the app needed this addition, it adds the element to take this toy further into a coding toy (yes another one) that it feels, to me, it should be.
All opinions in this blog are the Author's and should not in any way be seen as reflecting the views of any organisation the Author has any association with. Twitter @scottturneruon
Tried out the Junkbot controlled by a Crumble Controller (See here for plans for it) at the Code Club I help with at Roade Primary School, Northamptonshire. The first two images show the junkbot drawing the lines and dots on the paper just be using a spinning unbalanced motor.
In the figure below (though you can't see it) the connection between the motor and the power goes through the Crumble to allow the motor to change direction. Some the 'code-clubbers' have played with lowering the power via the Crumble and found below certain values (percentage of the maximum power available through the Crumble) the motor stalls.
All opinions in this blog are the Author's and should not in any way be seen as reflecting the views of any organisation the Author has any association with. Twitter @scottturneruon
All opinions in this blog are the Author's and should not in any way be seen as reflecting the views of any organisation the Author has any association with. Twitter @scottturneruon
Ajam, H., Ramdhany, R., Hammond, M. and Mu, M. (2017) A middleware to enable immersive multi-device online TV experience. In: Proceedings of the ACM International Conference on Interactive Experiences for TV and Online Video. New York: ACM. Conference: Association of Computing Machinery International Conference on Interactive Experiences for Television and Online Video (ACM TVX 2017) Hilversum, The Netherlands 14-16 June 2017 Abstract: Recent years have witnessed the boom of great technologies of smart devices transforming the entertainment industry, especially the traditional TV viewing experiences. In an effort to improve user engagement, many TV broadcasters are now investigating future generation content production and presentation using emerging technologies. In this paper, we introduce an ongoing work to enable immersive and interactive multi-device online TV experiences. Our project incorporates three essential developments on content authoring, device discovery, and cross-device media orchestration. To read more go to: http://nectar.northampton.ac.uk/9458/
All opinions in this blog are the Author's and should not in any way be seen as reflecting the views of any organisation the Author has any association with. Twitter @scottturneruon
All opinions in this blog are the Author's and should not in any way be seen as reflecting the views of any organisation the Author has any association with. Twitter @scottturneruon
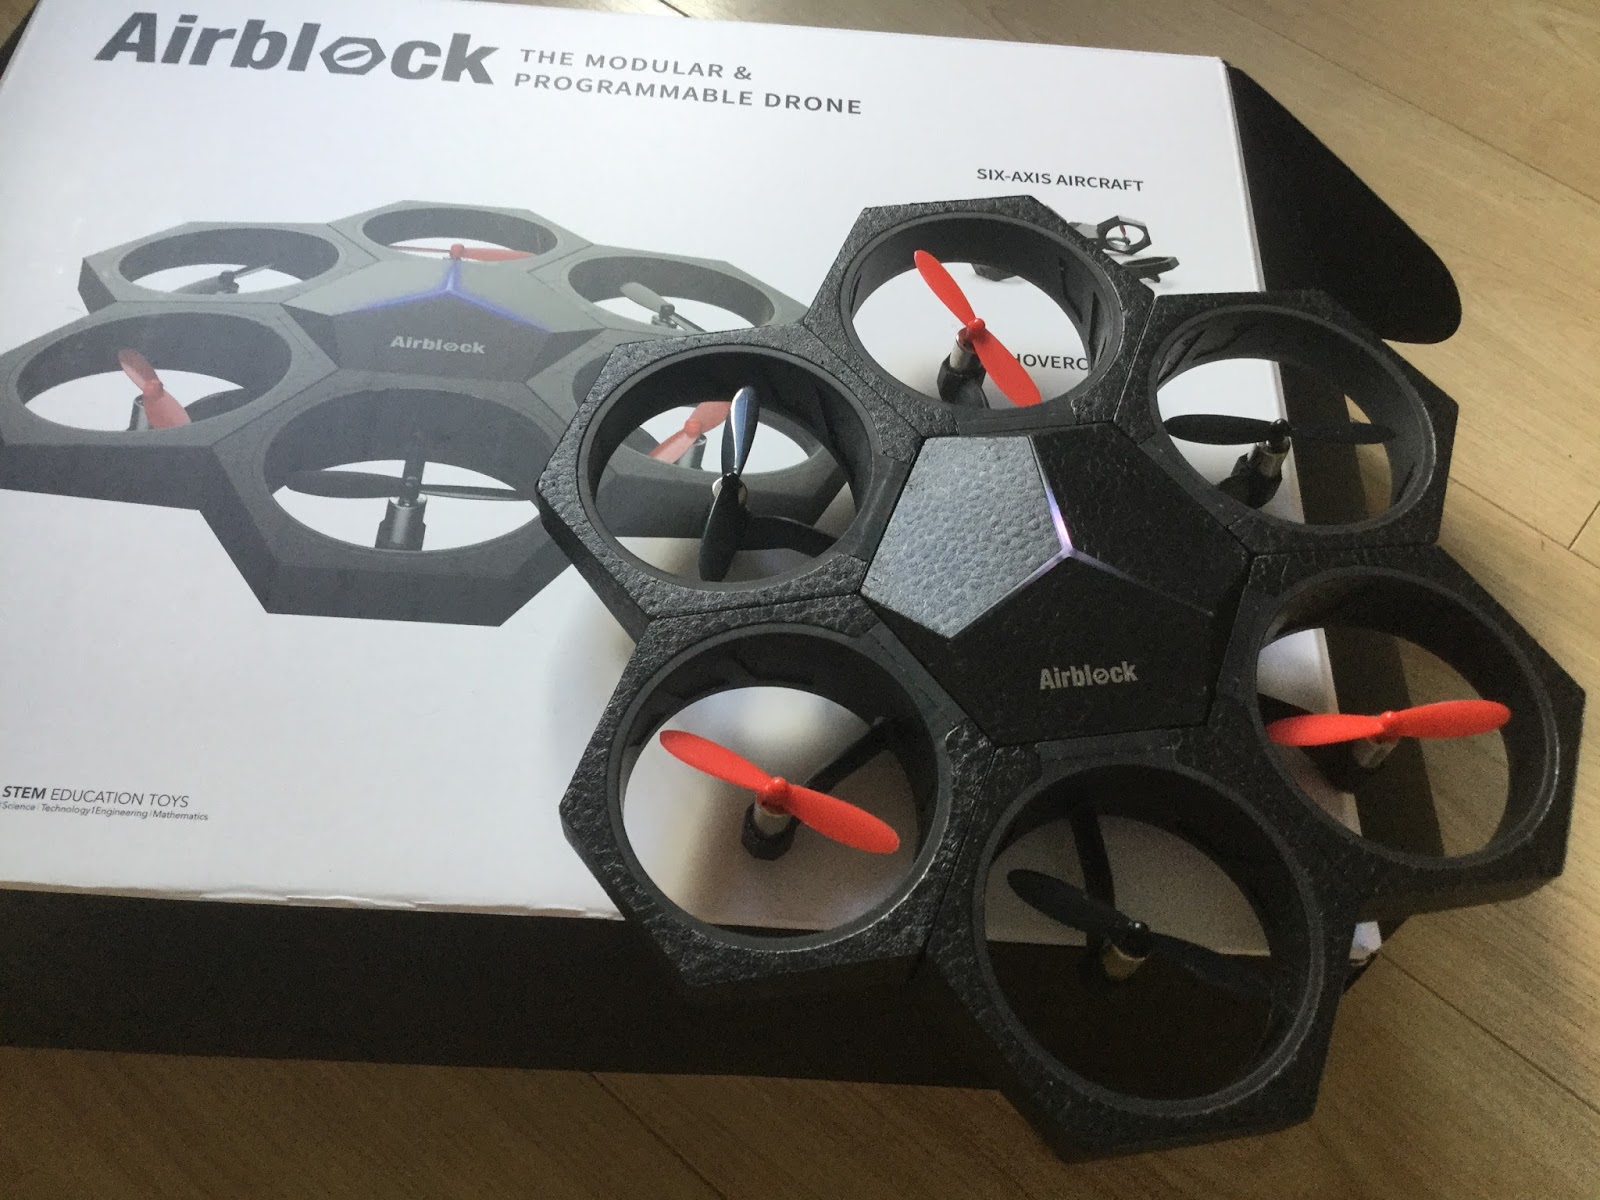
I recently received my Airblock drone from Makeblock funded through a kickstarter. If you want to see an Airblock in action this very funny video showing it being un-boxed from the Channel 5's Gadget Shown is worth a look. Of course I had to play with it in Air mode, it is a drone I want to see it fly. But there options for creating hovercraft and your own designs.
It is controllable via an app either by directly controlling or through Makeblock's own block based programming language Makeblock both are in the same app which is a feature I particularly liked. It can be annoying have to multiple apps for the same product.
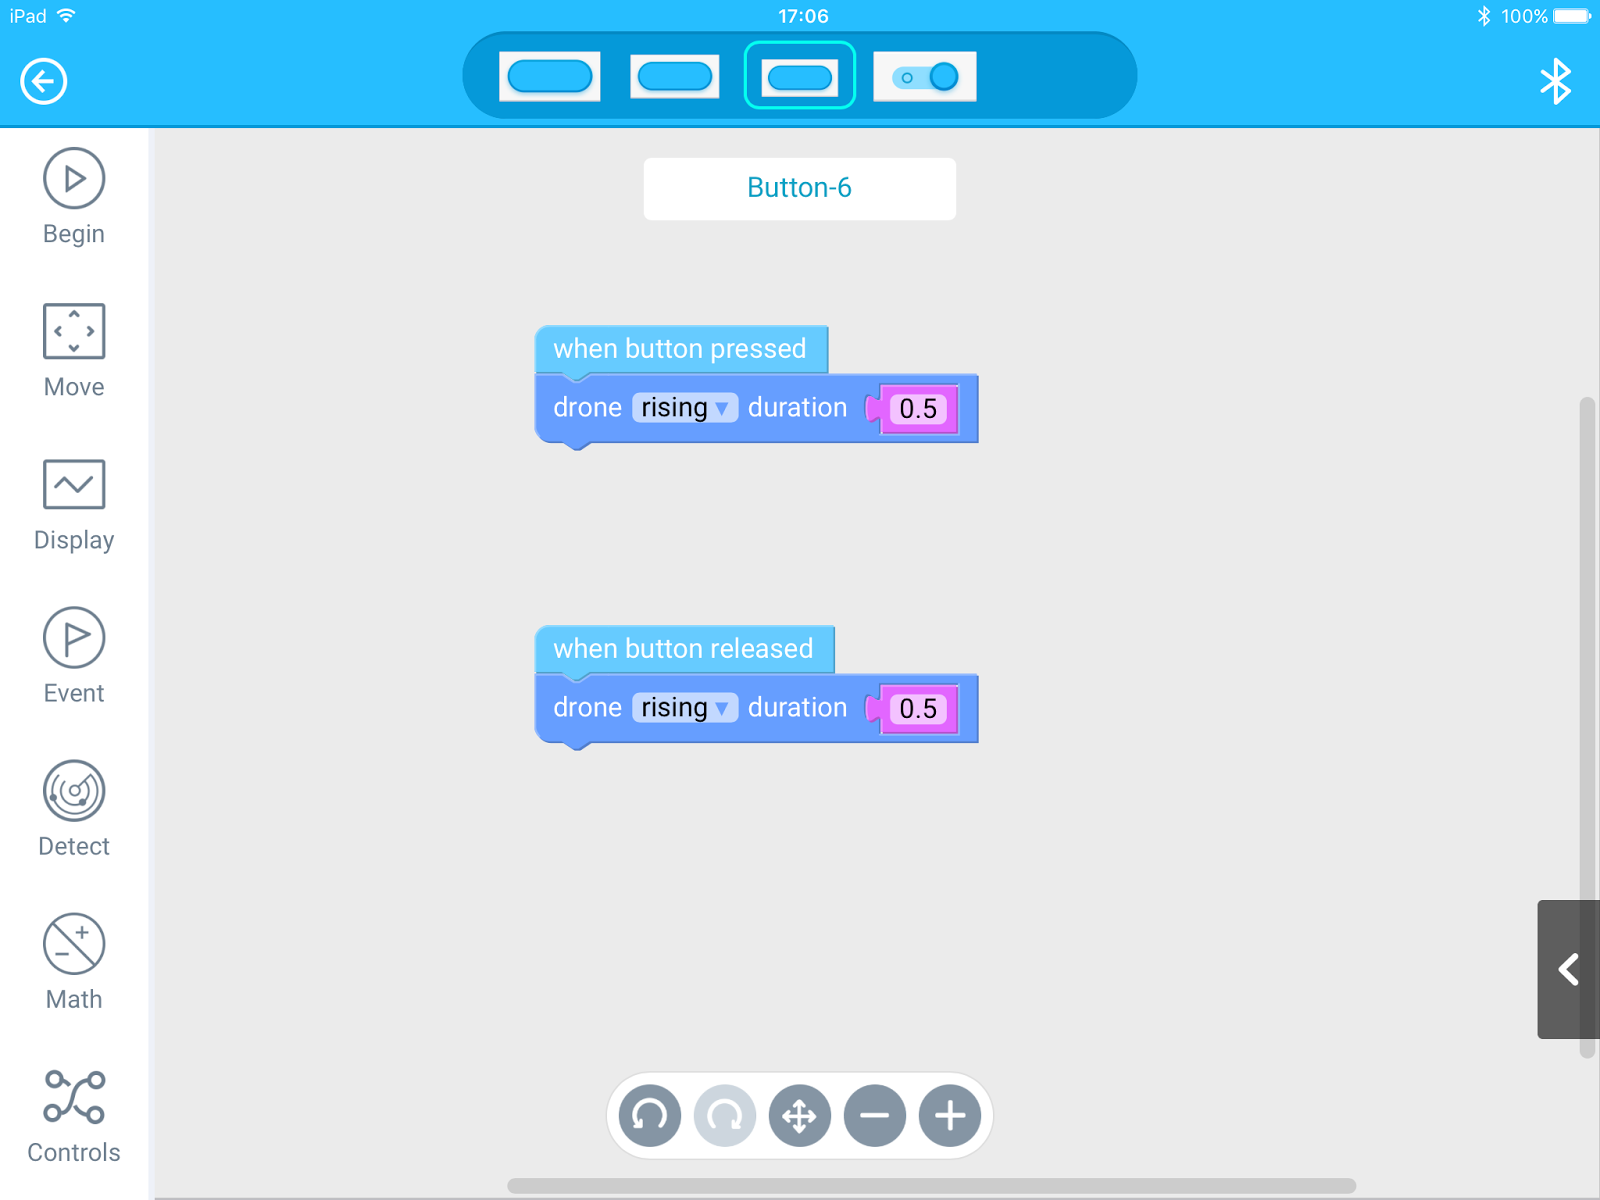
Selecting Air Mode (as below) means you can control it directly or chose New Project to program it.
In a new project, in design mode you can set up the interface dragging buttons into the project and then write code to go behind them. I found I needed to add a power switch in the interface.
Click on the button and you can drag blocks to program the drone. Take it out of design mode and it the appropriately name play mode and your are ready to go.
Great fun, but I struggle to control it (that is probably just me I do with most drones). When it hits anything the propeller units (prop, motor in polystyrene case, with a magnetic connector) do come away, as they are designed to do, for safety. A mistake I kept making was getting the propeller unit upside, but you quickly notice it - it goes all over the place. You will be playing 'hunt the prop' quite often when it crashes (and it will) they do seem to fly off. Great fun to play with; now are available to order/pre-order (at the time of writing) at https://makeblockshop.eu/products/makeblock-airblock . Related links:
All opinions in this blog are the Author's and should not in any way be seen as reflecting the views of any organisation the Author has any association with. Twitter @scottturneruon
I wanted to contol the CBiS micro:Bit Car via gestures whilst holding another micro:Bit (see Figure 1) I went for: - Button A in combination with moving the micro:bit left or right, moves 'Car' forwards or backwards; - Button B in combination with moving the micro:bit rotated forward or backwards, turns the 'Car' left or right; Perhaps not the most logical combination but fun.
Figure 1: CBiS micro:bit car and 'controller' micro:bit
The inspiration from this remote car idea came from four sources - CBiS Education site and seeing them demonstrating it; - Technology with Save Us Micro:bot Radio Control website ; - DrBadgr blog on the Lunch Box robot; - A twitter conversation
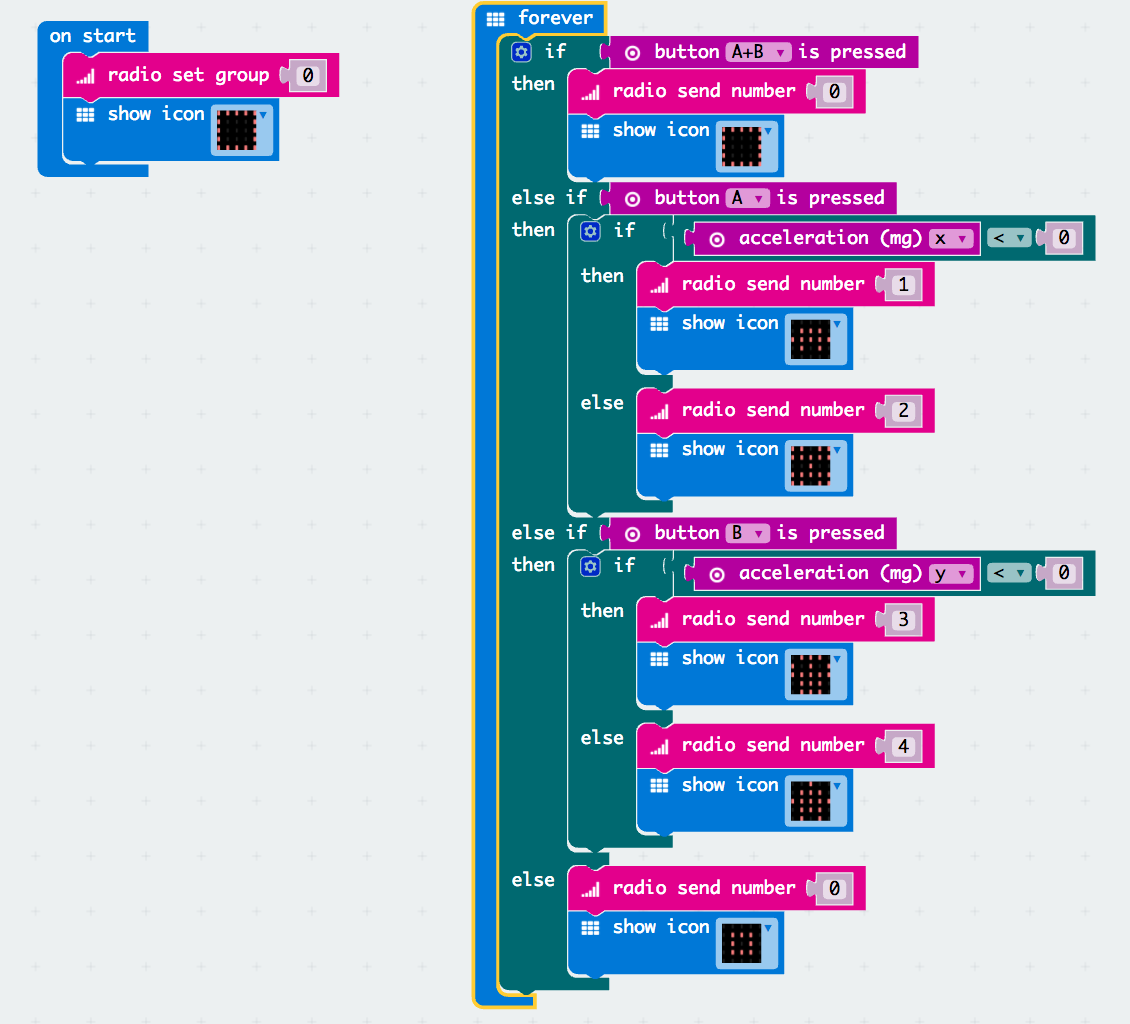
The approach taken is simple; the Controller micro:bit has the following operations (see Figure 2 for the PXT code)
Buttons A+B together send '0' out by a radio protocol;
Button A with changes in the x-direction send '1' or '2';
Button B with changes in the y-direction send '3' or '4' ;
Figure 2: Remote Control
For the code go to: Remote Control - the images produce on the micro:bit, are there as a bit of fun (they have no meaning) and are different for each action. The control on the 'Car' turns the received numbers (sent from the controller) into forward, backward, turning motions and stop. The PXT code can be found at Motor Control.
Figure 3: Car Control
The control is basic but fun (well I enjoyed it). There is a lot of scope for improvement and adaption. Please feel free to adapt any of the code and it would be great to hear what others do via the comments.
All opinions in this blog are the Author's and should not in any way be seen as reflecting the views of any organisation the Author has any association with. Twitter @scottturneruon
All opinions in this blog are the Author's and should not in any way be seen as reflecting the views of any organisation the Author has any association with. Twitter @scottturneruon
Recently bought a Bigtrak Rover, kind of the smaller 'sibling' of a Bigtrak (see above). Mobile Phone It has the some of the same functionality as the Bigtrak, though no cannon sound. Control is via an iPhone or Android phone app, giving the same direction and number of steps functions (see below) found on the larger Bigtrak.
Control via another device.
What is different to the Bigtrak is it can be controlled remotely from a PC, Mac or Tablet via a web interface. It also uses the phone's camera to provide a video stream and remote control via on-screen controls. What it doesn't have is programmable control (or I haven't found it yet). The web interface is Flash based; so there may be problems running this on iPads.
Overall A Nice, little robot that use the phone to control the robot. A set of cones gives the option of setting up an obstacle course. Once the app is installed it is very easy to get going with this. Would have liked programming from a PC or Mac.At the price, this is a good fun piece of kit. Related Links
All opinions in this blog are the Author's and should not in any way be seen as reflecting the views of any organisation the Author has any association with. Twitter @scottturneruon
At PiWars 2017 (1st-2nd April 2017), thanks to the generosity of CBiS Education, I now have one of their BBC micro:bit RobotCar™ . It is a sturdy bit of kit, encased in an aluminum chassis with a clear acrylic screen - it feels substantial when you pick it up. It is based around fours motors, control by a Micro:Bit, via L298N based motor controller/shield. Batteries power, 8 AAs, the motors and a Lithium powerbank to power the Micro:Bit - all included. More information about the technical details and example software can be found on their site https://www.cbis.education/robotic-car-kit# including further details on the L298N based motor controller/shield, which I found useful for programming it.
I have experimented briefly with programming it in Python (micropython), getting it to it move forward, backward; to the right and left, using the Mu editor. The code is shown below for those who want to try it:
This thing is quick. I like the feel of it, you pick it up and it doesn't feel like it is going to fall apart; because it comes all assembled - including batteries, it is ready to go. I look forward to trying some more ideas on it.
All opinions in this blog are the Author's and should not in any way be seen as reflecting the views of any organisation the Author has any association with. Twitter @scottturneruon
I was only able to stay at Pi Wars for a short while on Saturday 1st April. Even so, as a spectator, it was good fun. Here are a few pictures (and a video) for the day. Skittles - The course designers don't make anything easy.
Golf Course
Obstacle Course
It was not all robots, here is a Pi Controlled Drum Machine
My new toys
All opinions in this blog are the Author's and should not in any way be seen as reflecting the views of any organisation the Author has any association with. Twitter @scottturneruon
Continuing to play with PXT (http://pxt.microbit.org) and the Micro:bit, I wanted to try this in combination with a Proto-Pic Micro-pixel board with its 32 neopixel LEDs. The routine (shown in the screenshot below) use the Neopixels package (use the add package option on the menu to add it) to do two things:
On pressing button B - cycle through the colours and shift the colour to the next pixel producing a shifting pattern.
On pressing button A - the pixels are cleared one by one.
Code is shown above, and thank you to Jonathan "Peli" de Halleux (@pelikhan) for pointing out the redundant code I had left in, it is appreciated.
The video below shows the system in action: You can try the code out in the simulator below:
All opinions in this blog are the Author's and should not in any way be seen as reflecting the views of any organisation the Author has any association with. Twitter @scottturneruon


