Showing posts with label robot arm. Show all posts

Wednesday 17 August 2016

USB Robot arm control with Python and Raspberry Pi

I was asked recently if the USB robot arm could be programmed - I knew the answer was yes. The Arm came from the CBiS Education Robot Arm kit (http://www.cbis.education/Product-Details.aspx?prodid=2 ) which comes with a Raspberry Pi and SD Card with software to control the Arm. So the question has become - How do I program it in Python from scratch?

Well, the honest answer is I don't I use what others have done before. A good 
starting point is this site http://www.wikihow.com/Use-a-USB-Robotic-Arm-with-a-Raspberry-Pi-(Maplin), it gives most (pretty much all) of the answer, including where to get the pyusb library need; setting it up (be careful don't use the  zip file but the tar.gz version  - you might need to scroll down the screen to do this) and an example. A second source that was very useful was  http://notbrainsurgery.livejournal.com/38622.html?view=93150#t93150 which contains an explanation of the 'triples' (for example [32,0,0]) used to select which part of the arm moves and what it does (in the example [32,0,0] causes the Robot Elbow to move down).


The code below is largely based on the code in http://www.wikihow.com/Use-a-USB-Robotic-Arm-with-a-Raspberry-Pi-(Maplin) the only real changes are named procedures (such as ElbowUp) in place of the slightly less easy to understand lines such as  MoveArm(Duration,[4,0,0]) #wrist up . The only other changes was a procedure that changes what the light does (0 - light off; 1 - light on; 3 - pulses by a number of times).

import usb.core, usb.util, time
RoboArm = usb.core.find(idVendor=0x1267, idProduct=0x000)

if RoboArm is None:
    raise ValueError("Arm not found")

Duration=1
#Define a procedure to execute each movement
def MoveArm(Duration, ArmCmd):
    #Start the movement
    RoboArm.ctrl_transfer(0x40,6,0x100,0,ArmCmd,3)
    #Stop the movement after waiting a specified duration
    time.sleep(Duration)
    ArmCmd=[0,0,0]
    RoboArm.ctrl_transfer(0x40,6,0x100,0,ArmCmd,3)

def RotateBaseClockwise(Duration):
    MoveArm(Duration,[0,1,0]) #Rotate base clockwise

def RotateBaseAntiClockwise(Duration):
    MoveArm(Duration,[0,2,0]) #Rotate base clockwise

def ElbowUp(Duration):
    MoveArm(Duration,[16,0,0]) #Elbow up 0x10

def ElbowDown(Duration):
    MoveArm(Duration,[32,0,0]) #Elbow down 0x20

def WristUp(Duration):
    MoveArm(Duration,[4,0,0]) #wrist up 0x04

def WristDown(Duration):
    MoveArm(Duration,[8,0,0]) #wrist down 0x08

def CloseGripper(Duration):
    MoveArm(Duration,[1,0,0]) #close gripper 0x01

def OpenGripper(Duration):
    MoveArm(Duration,[2,0,0]) #open gripper 0x02

def ShoulderUp(Duration):
    MoveArm(Duration,[64,0,0]) #shoulder up 0x40

def ShoulderDown(Duration):
    MoveArm(Duration,[128,0,0]) #shoulder down 0x80

def GripLight(Action, Duration):
    if (Action==1):
        MoveArm(Duration,[0,0,1]) #light on
    if (Action==0):
        MoveArm(Duration,[0,0,0]) #light off
    if (Action==3):
        for x in range(Duration):
            MoveArm(1,[0,0,1]) #light on
            MoveArm(1,[0,0,0]) #light off

WristUp(0.5)
OpenGripper(0.5)
RotateBaseClockwise(2)
RotateBaseAntiClockwise(2)
ElbowUp(1)
ElbowDown(1)
WristDown(0.5)
CloseGripper(0.5)
ShoulderUp(3)
ShoulderDown(1)
GripLight(3,3)


See it action in the video below.


All opinions in this blog are the Author's and should not in any way be seen as reflecting the views of any organisation the Author has any association with.

Wednesday 1 June 2016

Robot Arm in School


Santander UK
 recently provided the funding for a project I have want to do for a while; to loan robot arm kits, which are pretty much self-contained, out to schools to see what they come up with. The idea being to provide the kit for a year and the schools taking part write a blog post (or more than one), sharing what they have done.
 
The chosen kit is the CBiS Education robot arm hub because it comes with the robot arm, cables, raspberry pi, etc as well as screen, keyboard and mouse in one go (see the picture above).

The kits should start going out some of the schools next week.


I am grateful to Santander UK for the funding; CBiS Education for their support and advice so far; last but not least the schools who have enthusiastically expressed an interest in taking part.


All opinions in this blog are the Author's and should not in any way be seen as reflecting the views of any organisation the Author has any association with.
Monday 16 May 2016

First Try with 7bot Robot Arm

In a previous post (http://robotsandphysicalcomputing.blogspot.co.uk/2016/05/playing-7bot-robot-arm.html) I discussed starting to set up the 7bot robot arm (https://www.kickstarter.com/projects/1128055363/7bot-a-powerful-desktop-robot-arm-for-future-inven) . I have still to set up the gripper.

This post document my first tentative steps with playing with it. The code below was used to try and get my head around the positioning of the arm - which servo does what (a good guide for this has been provide by the company online) and what the changing angle on the servos actual does. Essentially the code puts the arm in a starting position and varies the angles from there in usually in 15 or 30 degree increments over seven positions.

#include <Servo.h>
#include <DueFlashStorage.h>
#include <Arm7Bot.h>
Arm7Bot Arm;
void setup() {
  // initial 7Bot Arm
  Arm.initialMove();
}

void loop() {
  // set motor[0] speed to 100
  Arm.maxSpeed[0] = 30;
    double angles_0[SERVO_NUM] =  {0, 100, 90, 0, 90, 90, 75};
  Arm.move(angles_0);
  // Move to pose 1
  double angles_1[SERVO_NUM] =  {0, 100, 0, 0, 90, 90, 75};
  Arm.move(angles_1);
  // Move to pose 2
  double angles_2[SERVO_NUM] =  {30, 110, 15, 0, 90, 90, 75};
  Arm.move(angles_2);
  // Move to pose 3
  double angles_3[SERVO_NUM] =  {60, 120, 30, 0, 90, 90, 75};
  Arm.move(angles_3);
  // Move to pose 4
  double angles_4[SERVO_NUM] =  {90, 130, 45, 0, 90, 90, 75};
  Arm.move(angles_4);
   // Move to pose 5
  double angles_5[SERVO_NUM] =  {120, 140, 60, 0, 90, 90, 75};
  Arm.move(angles_5);
  // Move to pose 6
  double angles_6[SERVO_NUM] =  {150, 150, 75, 0, 90, 90, 75};
  Arm.move(angles_6);
  
}   

Video below shows the routine in action.


All opinions in this blog are the Author's and should not in any way be seen as reflecting the views of any organisation the Author has any association with.

Wednesday 4 May 2016

Playing with 7bot robot arm

The 7bot is a recent kickstarter project https://www.kickstarter.com/projects/1128055363/7bot-a-powerful-desktop-robot-arm-for-future-inven from 7bot. A metal robot arm based around Arduino Due (https://www.arduino.cc/en/Guide/ArduinoDue ). Development of the software, at the time of writing, is still ongoing but looks interesting and already on the comments page of the site, user's have started posted their code. 


Had to install the following software and put the un-zipped files in the library folder of the Arduino folder.

https://github.com/7Bot
https://github.com/sebnil/DueFlashStorage 

Some useful information of setting up using the Arduino Due is available at https://www.arduino.cc/en/Guide/ArduinoDue and is definitely worth a read - it helped me setting it up.


At the moment I have just used the examples from the GitHub site and example is shown in the video below. This looks like an exciting little arm and hopefully there will be more on this blog about it.


I would be interested in hearing from others who have been playing with this arm.


All opinions in this blog are the Author's and should not in any way be seen as reflecting the views of any organisation the Author has any association with.

Thursday 23 July 2015

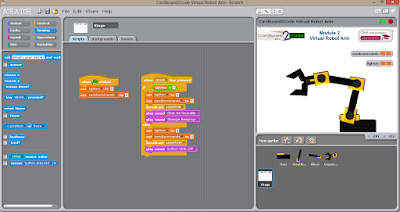
Scratch Robot Arm

It is not physical but CBiS Education have release a free robot arm simulator for Scratch. 


Downloadable from their site http://www.cbinfosystems.com/cardboard2code_module2.aspx - it includes a Scratch project, guidance on Scratch along with an exercises in using the robot arm simulation and an exercise with teacher's guidance.

Left my son with it, asked him if he could make it do something if a new sprite is added and the gripper touched it (similar to the exercise in the notes). He went on to produce a sprite that when it is touched by the gripper, went on to change colour a few times. I could see this being potentially used in Coding Clubs within schools.


CBiS produce a physical version of this, details are available at  http://www.cbinfosystems.com/cardboard2code_module3.aspx


All opinions in this blog are the Author's and should not in any way be seen as reflecting the views of any organisation the Author has any association with.

Top posts on this blog in March 2024

The Top 10 viewed post on this blog in March 2024. Covering areas such as small robots, augmented reality, Scratch programming, robots. Micr...